
How to Navigate the Japanese Import Process
Japan Import Certificate Tips
-
ADHD Medication in Japan
Before you travel to Japan, you need to ensure the legality of your adhd medication in Japan. There are different medication restrictions in Japan depending on the different ADHD medication brands you use.
-
Gather Documentation
Once you have determined the legality of your ADHD medications in Japan, the next step is to coordinate with your doctor to ensure you have the proper documentation. For the Japanese import certificate, you will need a doctor’s note and a list of prescriptions.
-
Fill Out Import Application
Once you have gathered all the proper documentation, it is time to create an account and fill out the Yunyu Kakunin-Sho application to bring your ADHD medication to Japan. We have outlined the Japanese import certificate process below.
Get Started
Set Up Your Account
In order to be able to bring your controlled substances into Japan, you will need to go through the Yunyu Kakunin-Sho / Japanese Import Process.
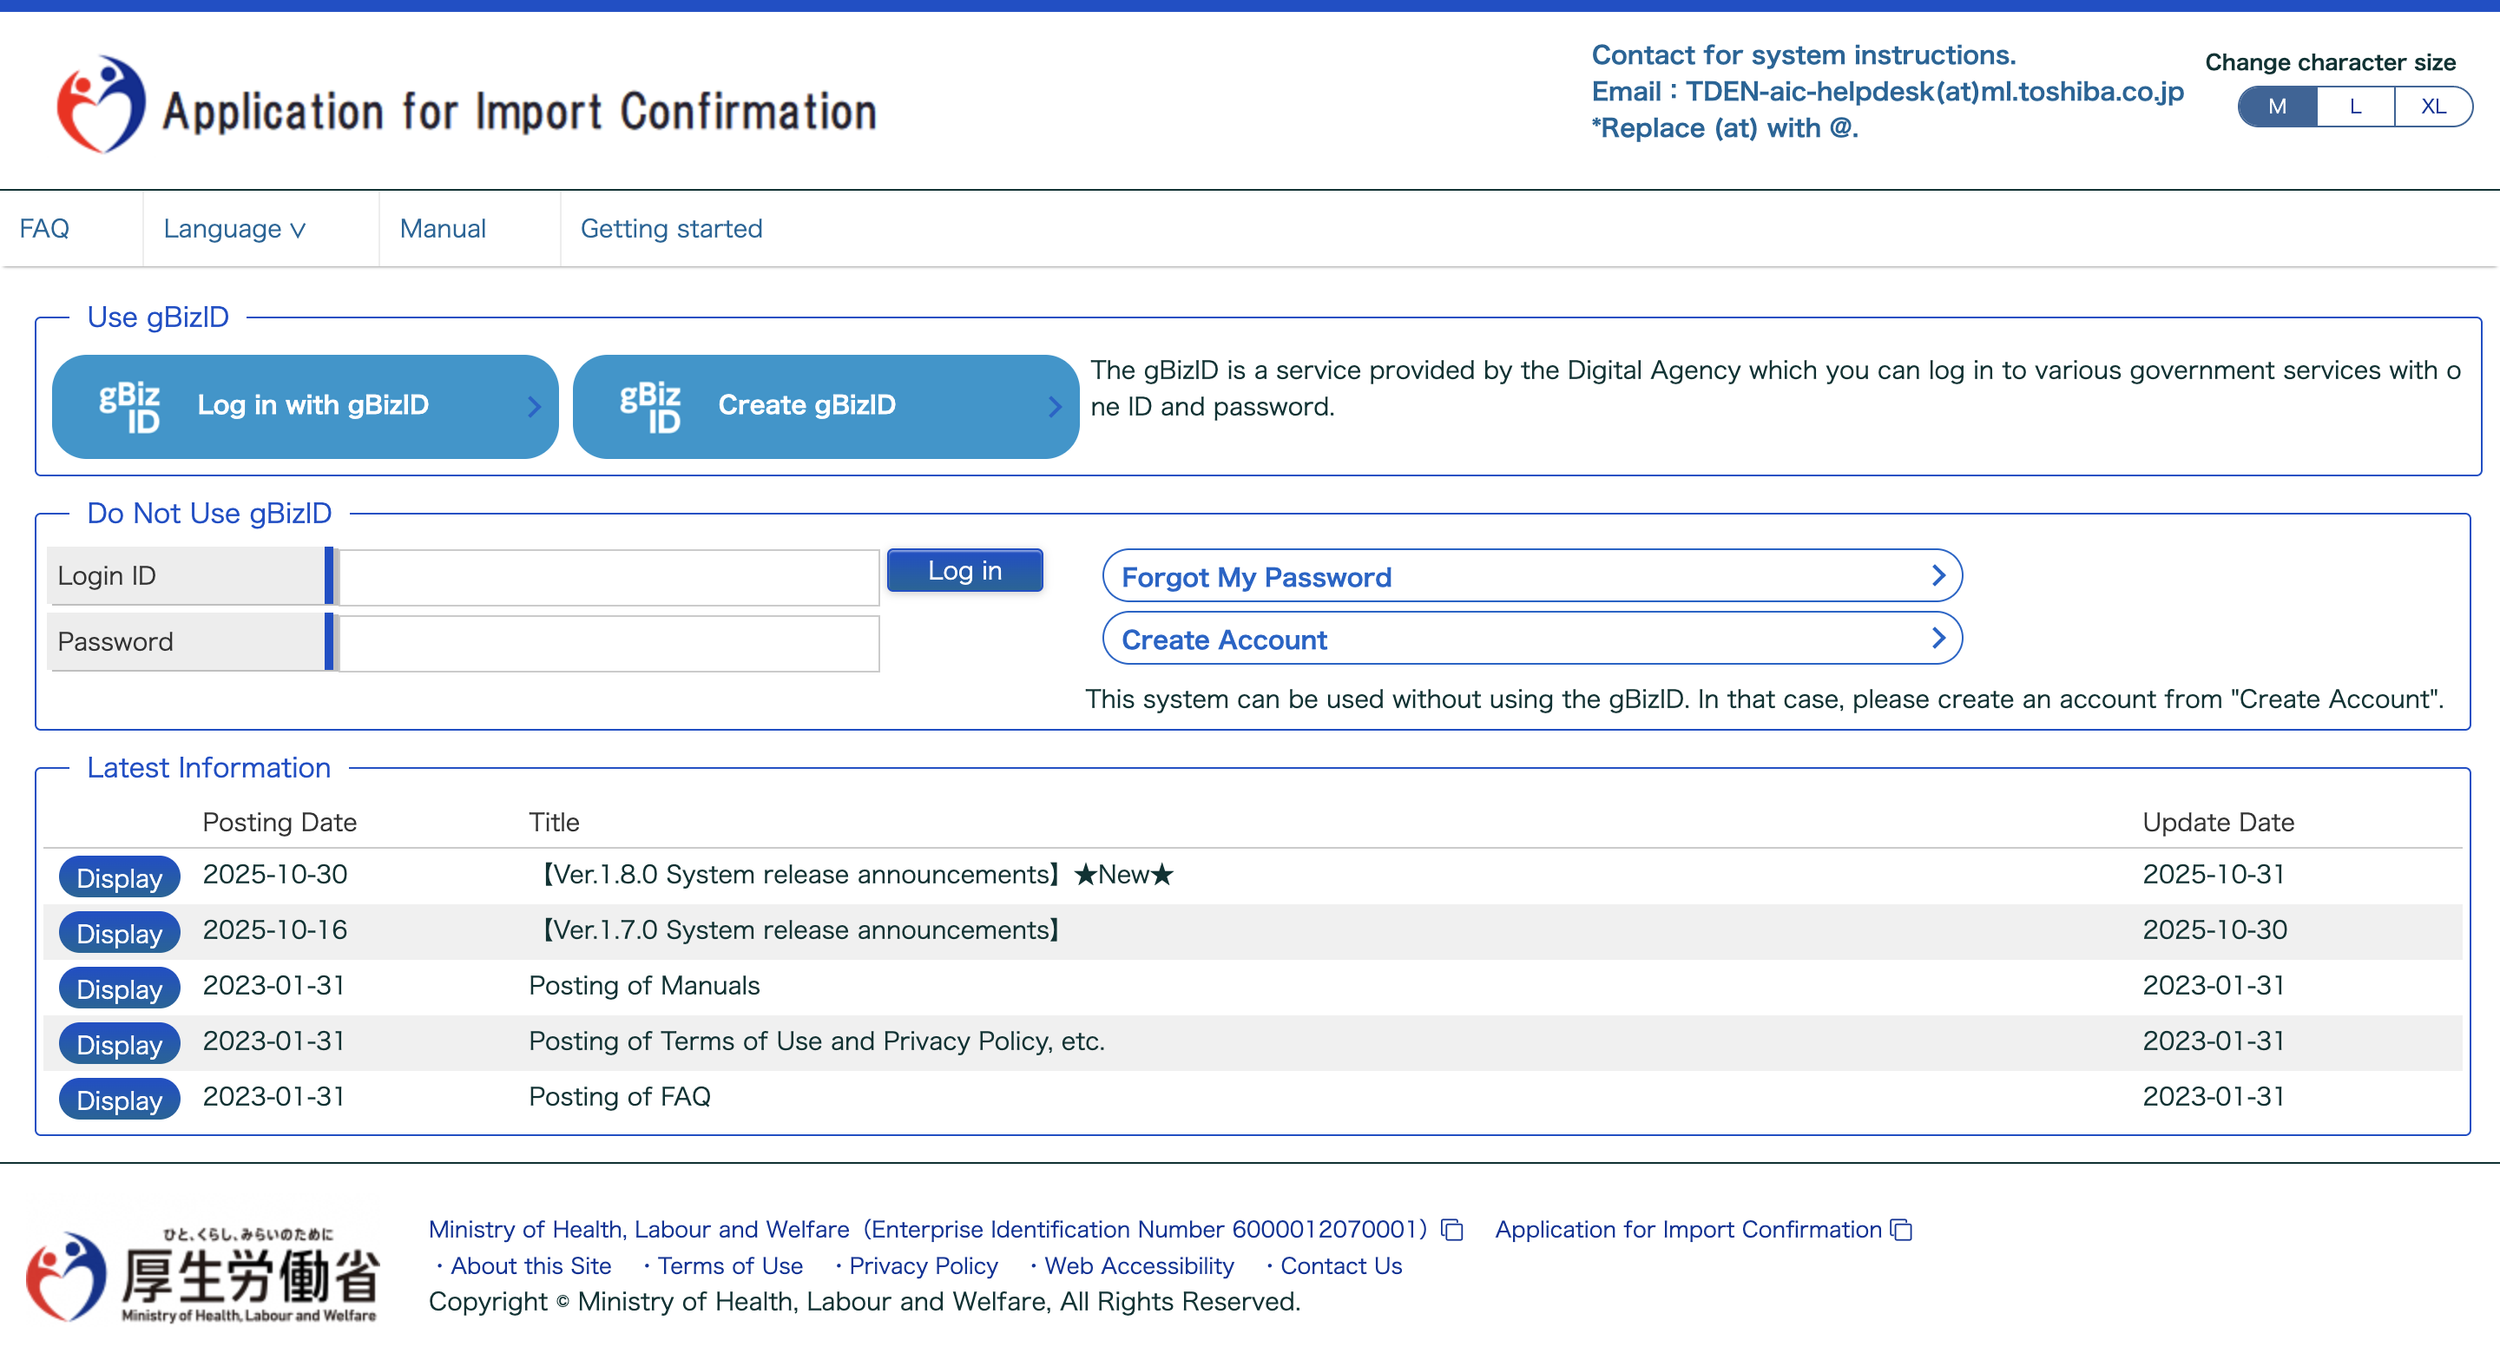
The first step to this is to create an account in their online portal. In this article, we will give you a step-by-step guide to setting up your account for the Yunyu Kakunin-Sho. You can find the English site for import applications here: https://impconf.mhlw.go.jp/aicpte/page/login.jsp?lang=en/
This is what the English site looks like on your first visit. For this instance, you will want to go to the section titled “Do Not Use gBizID” and select the “Create Account” option.
Enter Email Address
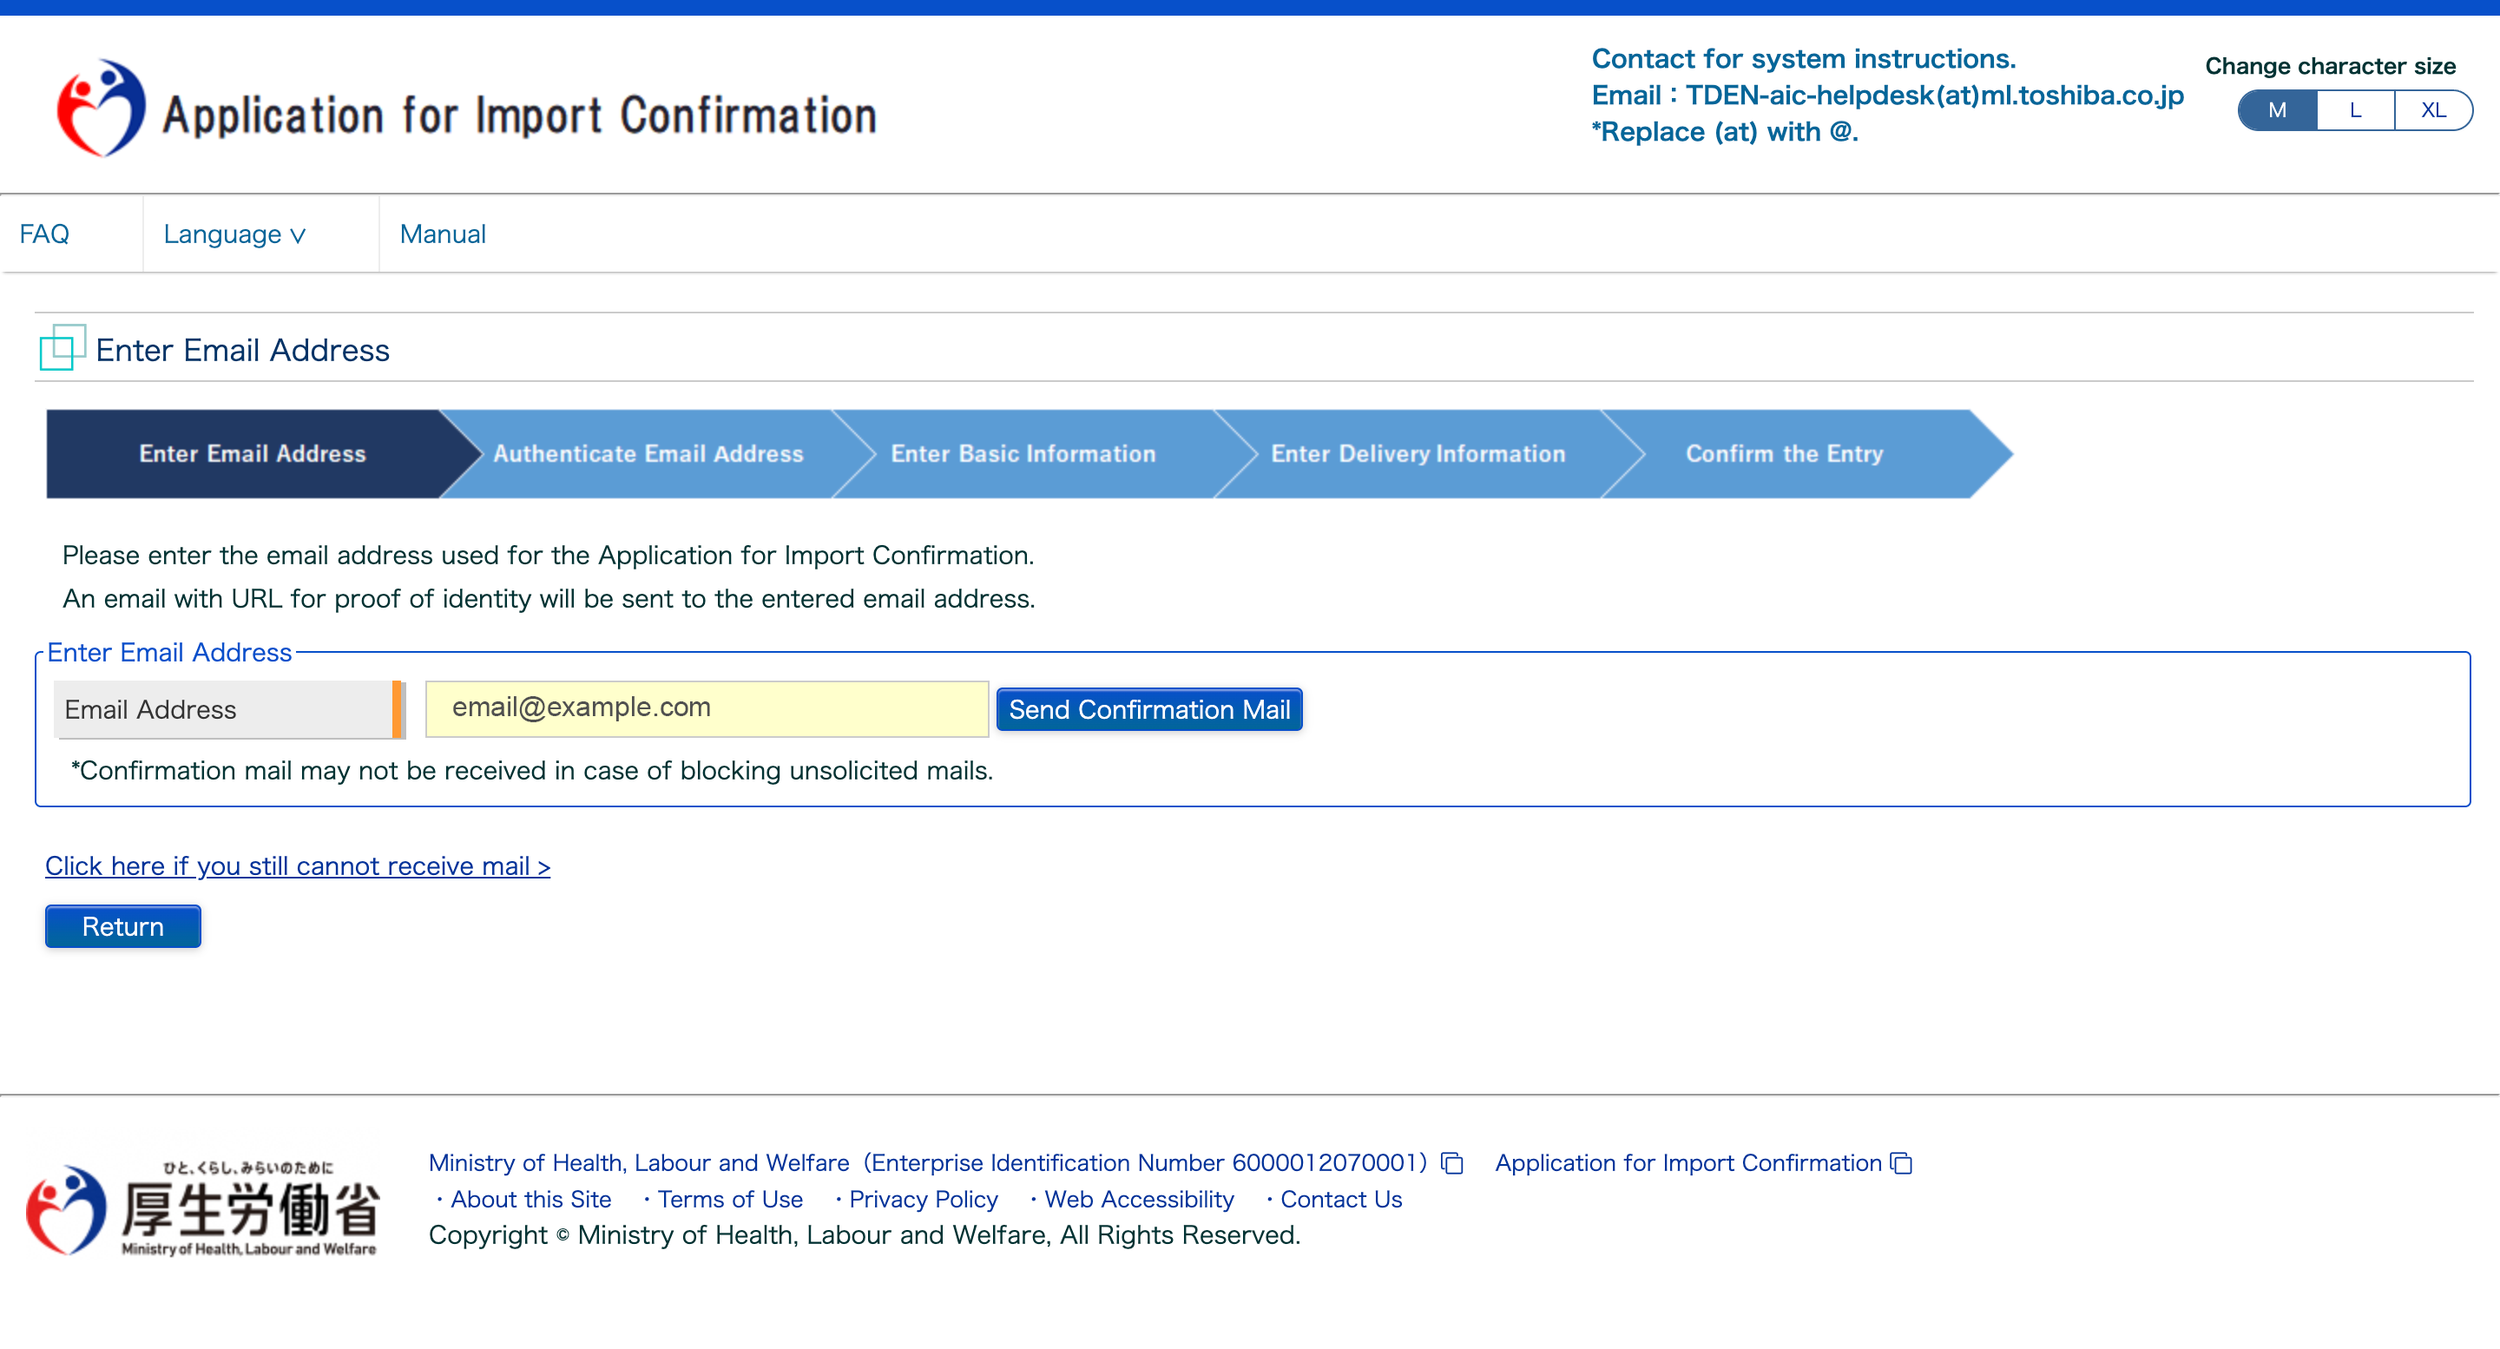
The next step to creating your account is to enter your email address. In the blank field, enter your email address and select “Send Confirmation Mail.” A pop-up should appear, stating “A notification email has been sent to the entered email address. Please follow the instructions in the email.”
Check your inbox for an email from “system” with “Account Confirmation Notice” in the subject line. If you are unable to find it within a few minutes, be sure to check your spam folders as well. Follow the steps provided in the email to move on to the next step, which is authenticating your email address.
Authenticate Email Address
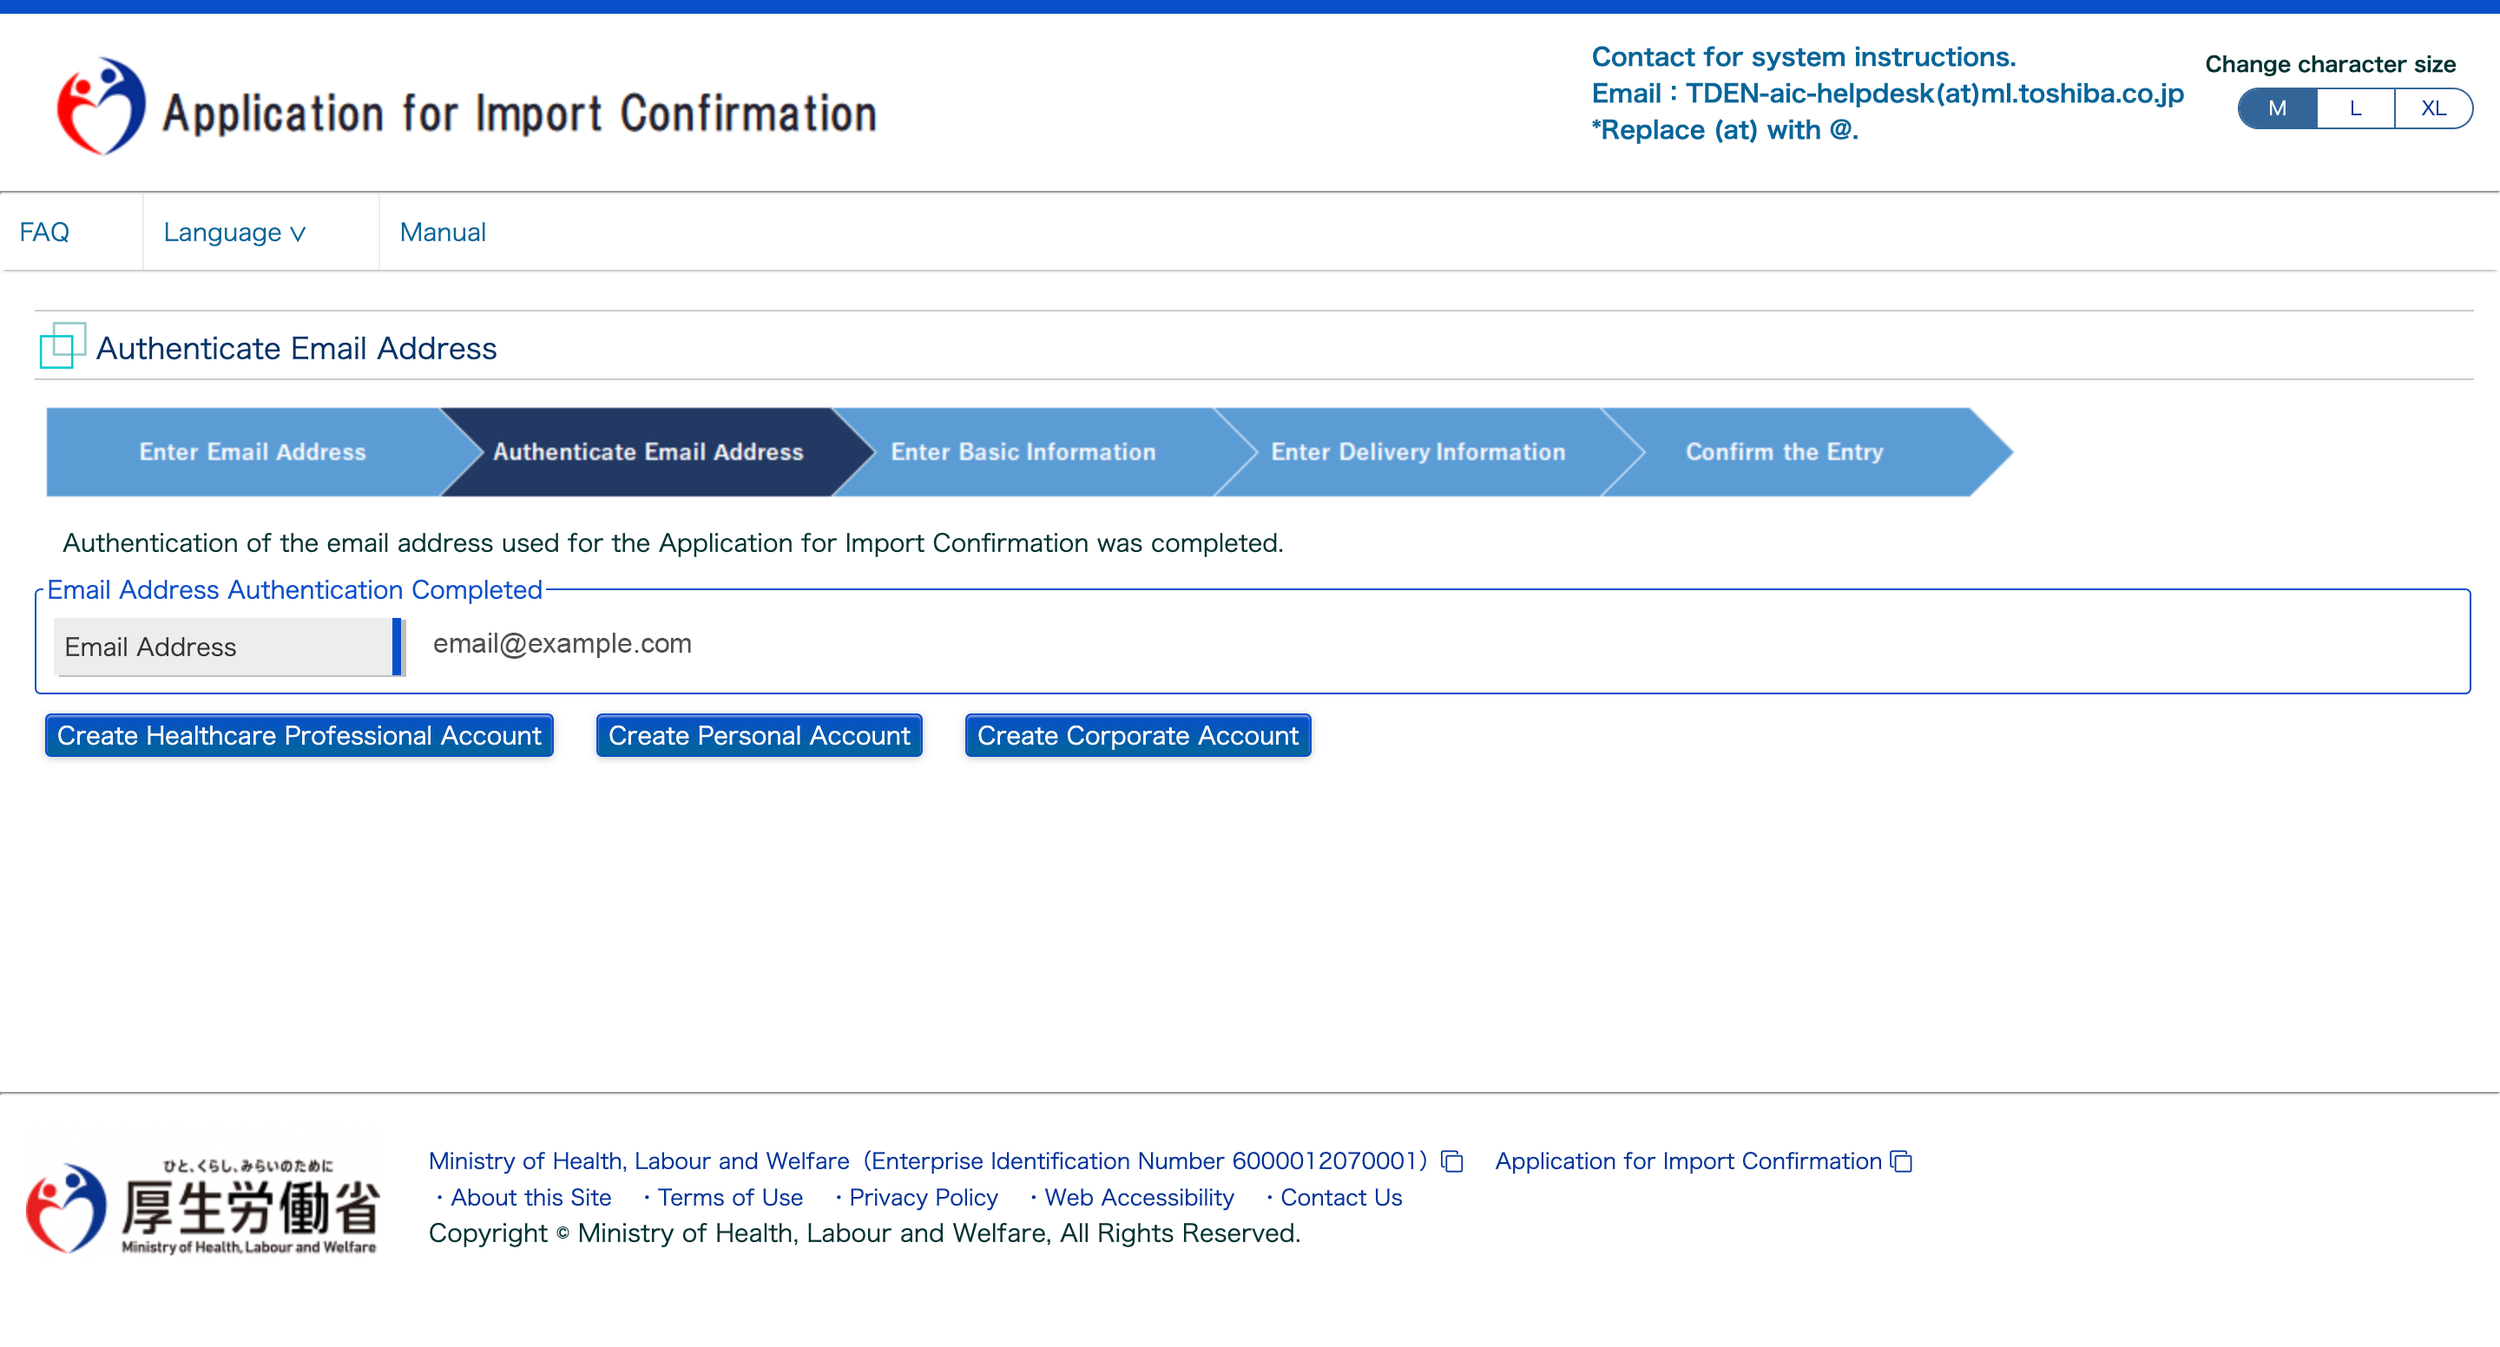
Follow the link provided in your email to authenticate your email address. Next, you will be directed to this page. Since you are taking your medications with you personally, you will select the “Create Personal Account” option.
Enter Basic Information
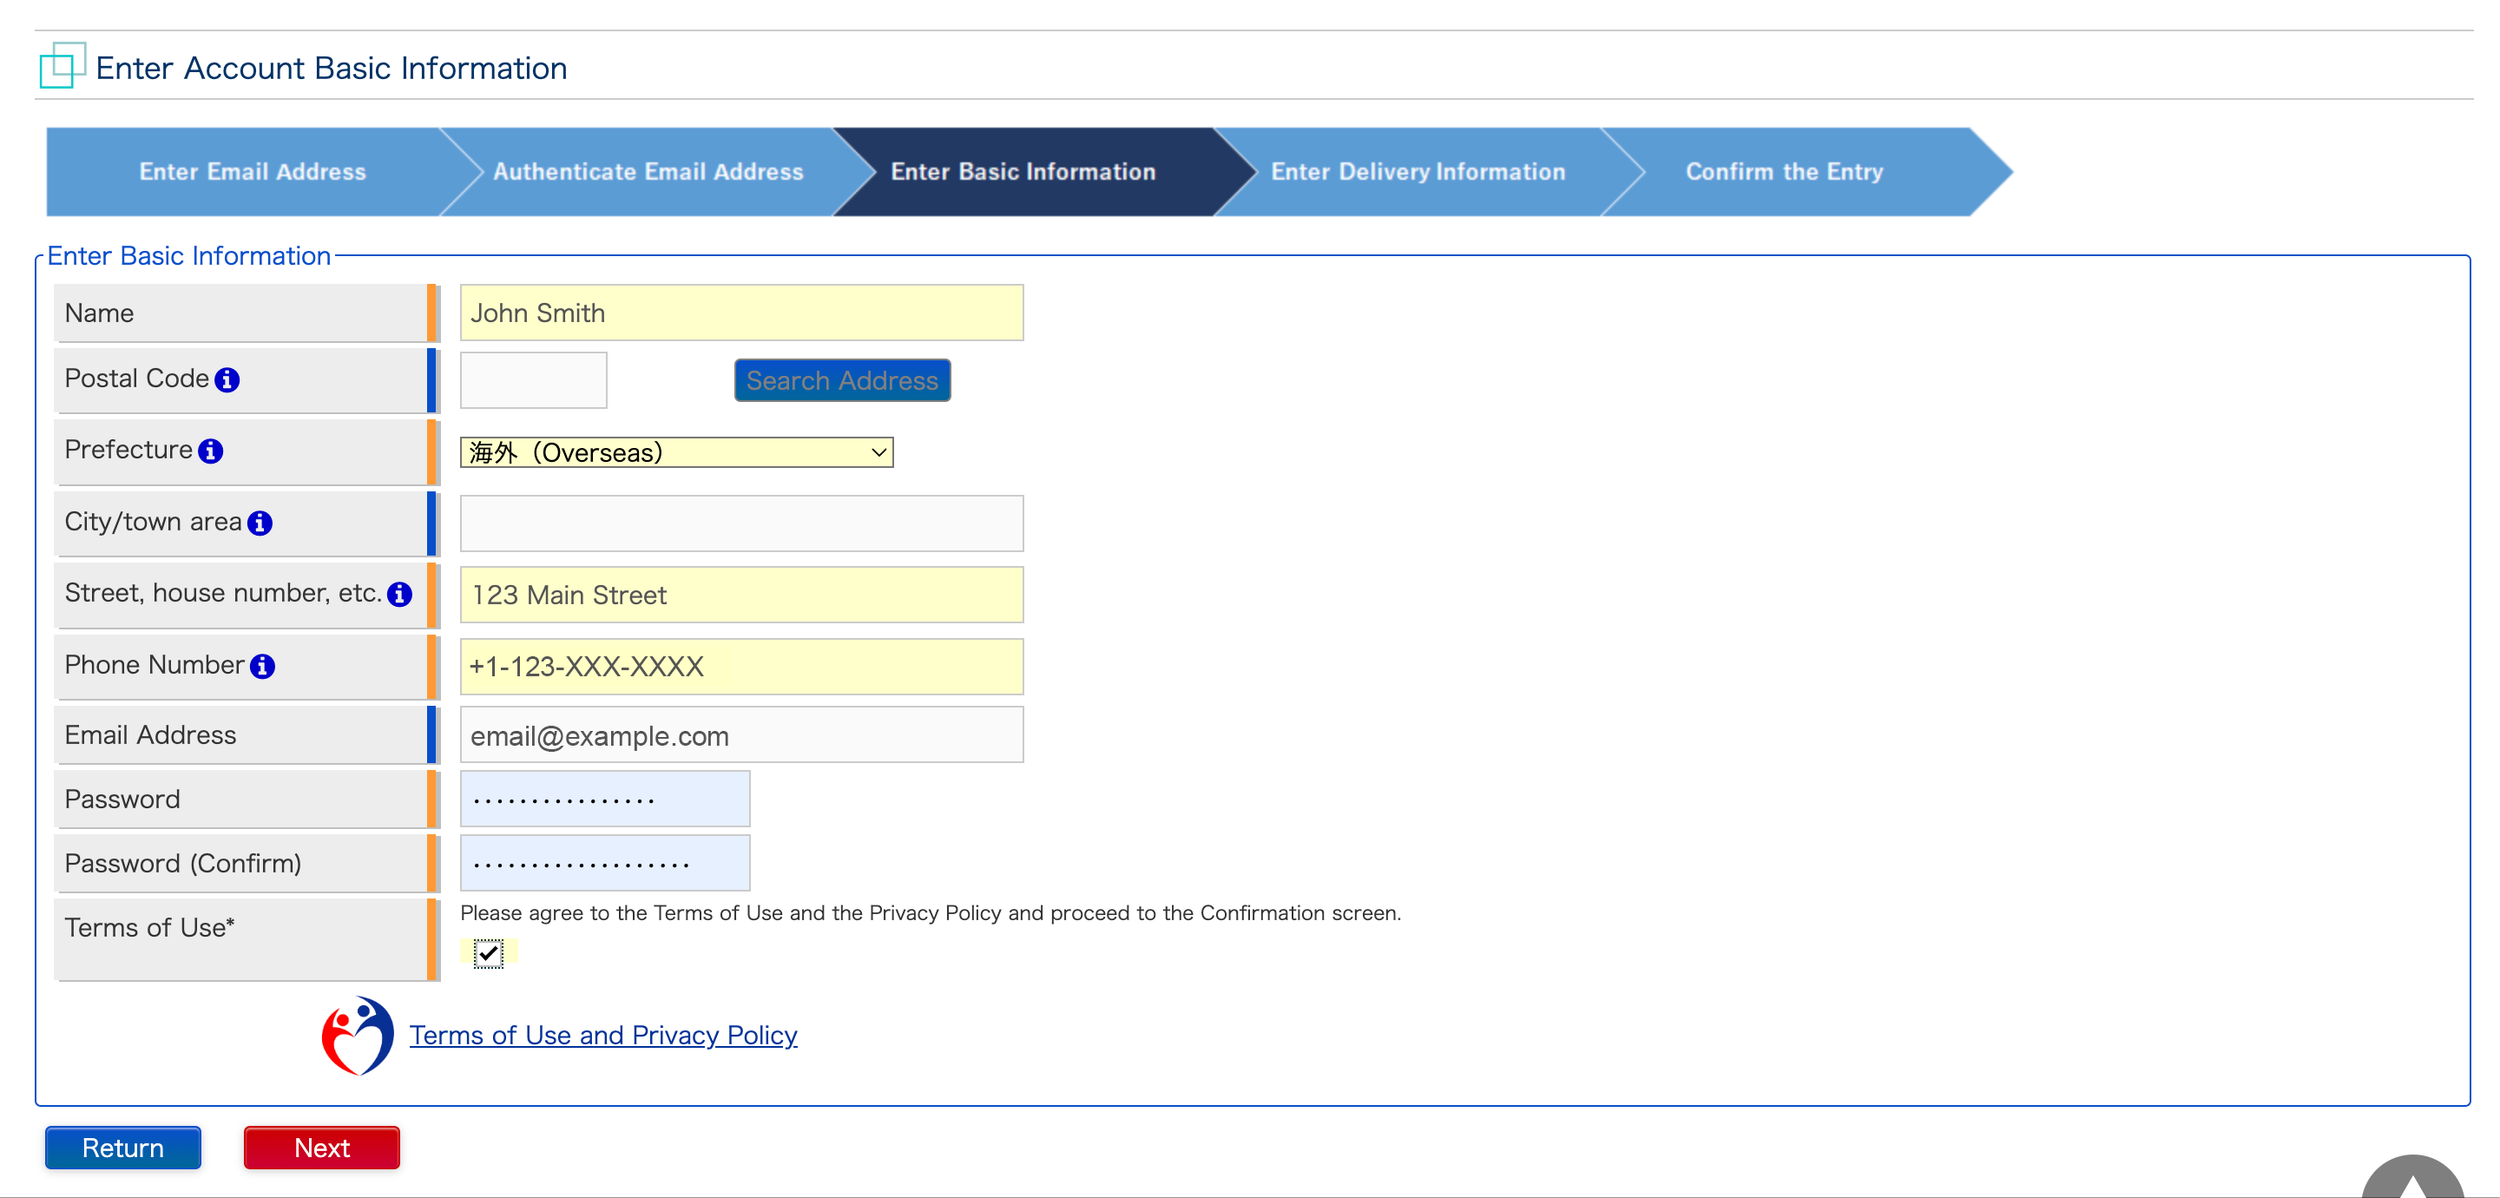
In the Enter Basic Information tab, fill out the required text fields.
In Name, fill out your first and last name as seen on your prescriptions. In this case, since you are traveling from outside Japan, you can leave the Postal Code section blank.
For Prefecture, select the dropdown and choose the “Overseas” option, as shown below. Because you have selected “Overseas,” the City/town area will automatically be left blank.
For Street, house number, etc., enter the street address of your home. For this example, the address is 123 Main Street. You do not need to write out the whole address for this section, only the street address and house or apartment number if applicable.
In the Phone Number section, write out your full phone number in the format shown in the example below, including the country code (+1 for the United States) and area code.
The Email Address will be automatically filled with the one you used to sign up with. In the next fields, create a Password and type it again in the Password (Confirm) field.
Next, select the checkbox for Terms of Use. You can read the Terms of Use and Privacy Policy by following the link in the form.
Finally, once you have filled all required fields, you can move on to the next step by selecting the red “Next” button.
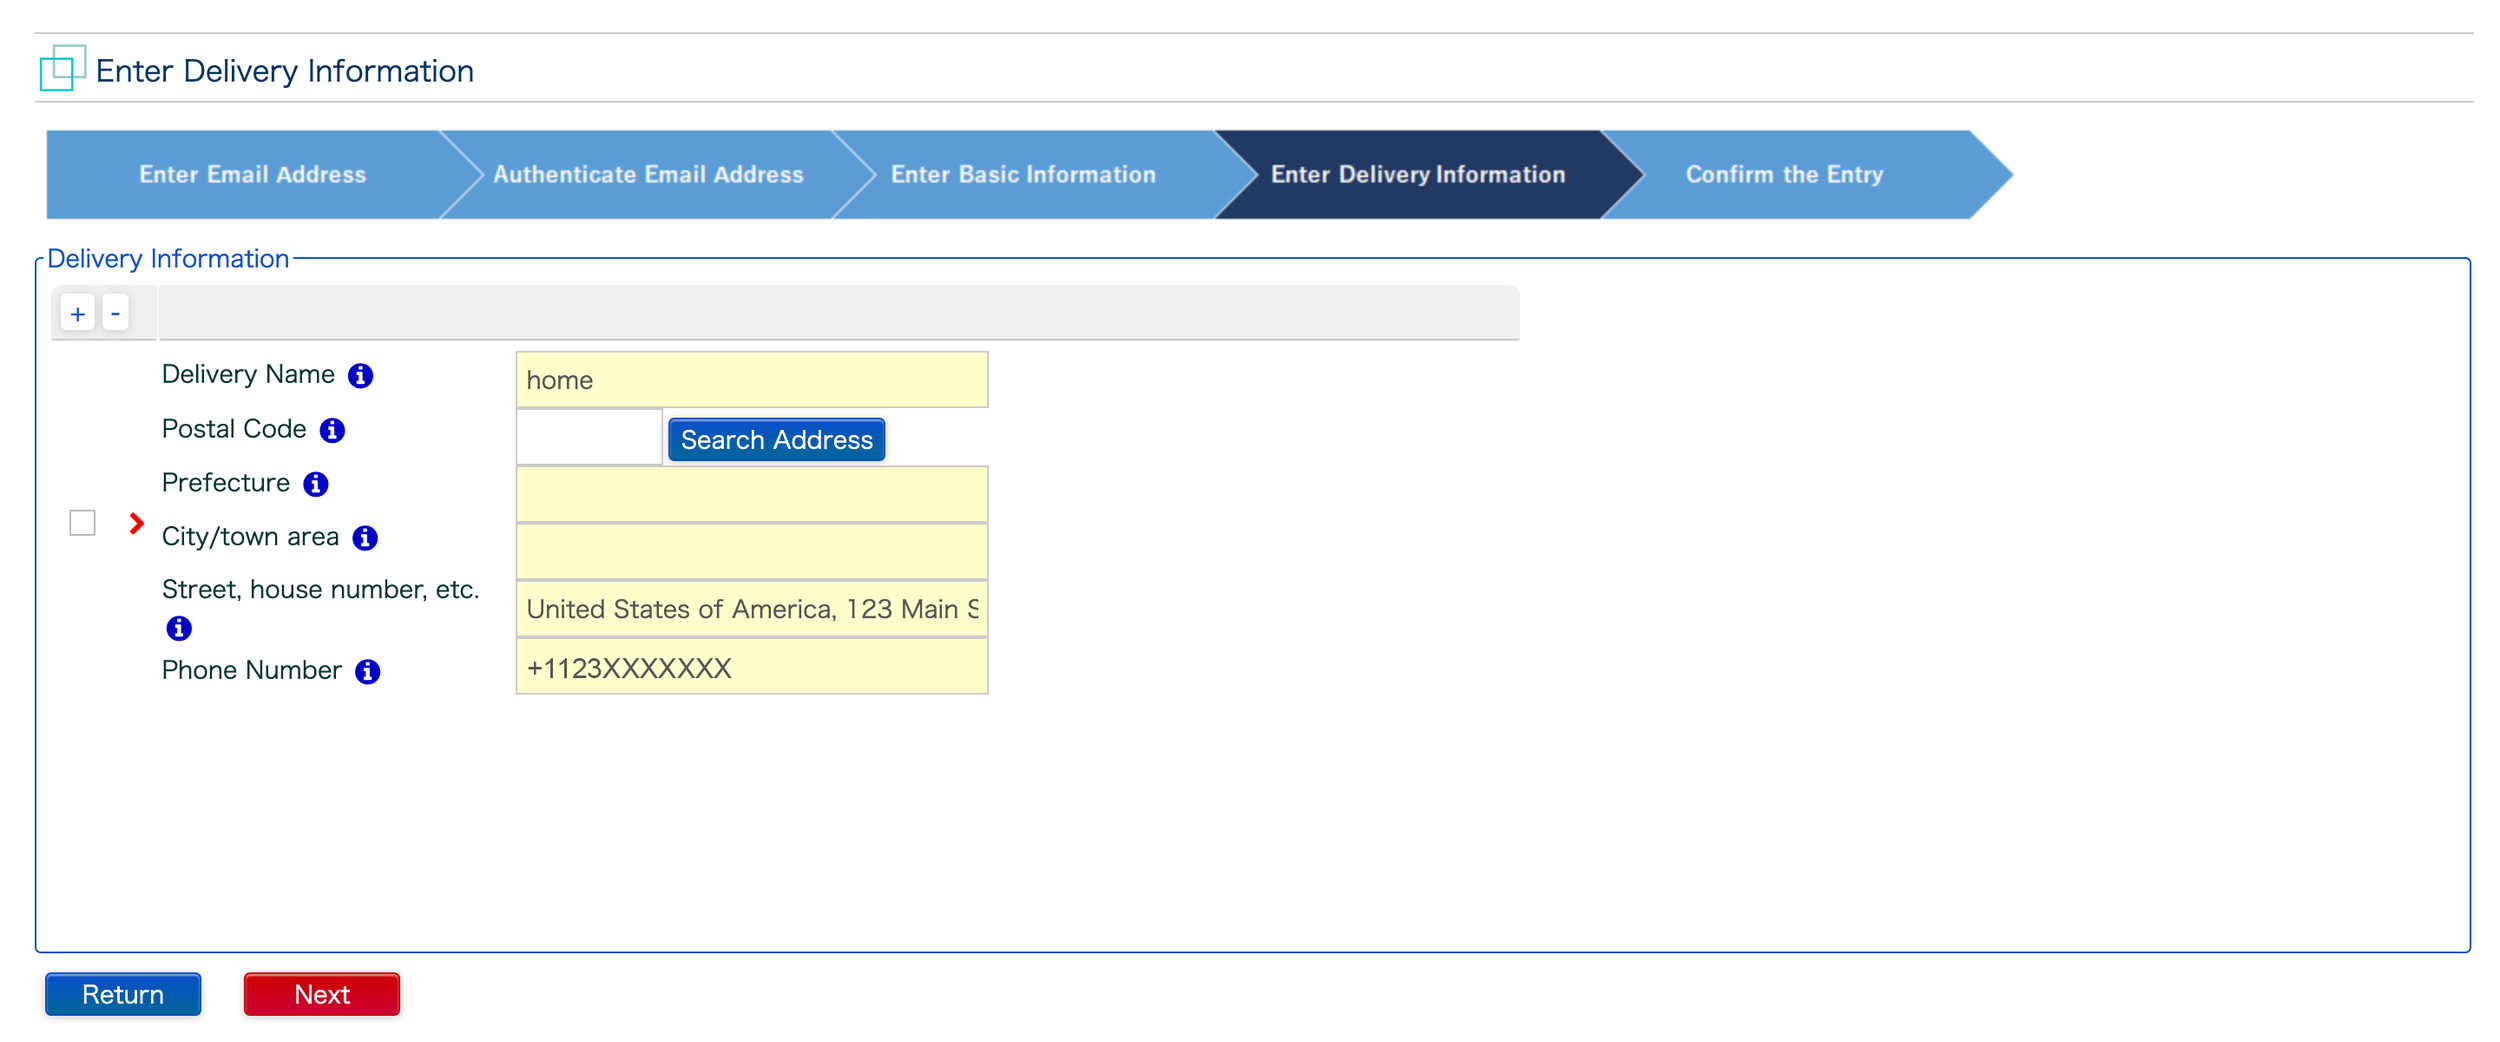
Enter Delivery Information
The next step is to enter to Delivery Information.
Firstly, for the Delivery Name section, it depends on how you will be bringing your medication into the country. The easiest and most simple way to do so is to bring your medication with you personally through customs. In that case, you will write “home” for your Delivery Name. In this form, you will simply be writing your home address.
For Postal Code, since you are not having the medication delivered to an address in Japan, you can simply leave this field blank.
In the Prefecture and City/town area fields, since your address is outside of Japan, simply type a single space in both fields. For information on delivering to addresses in Japan, please reference the blue information icons next to each text field title.
The next field is the most important. For Street, house number, etc. you will be asked to write your full address in this exact format: Full Country Name, Street Address, City, State, Postal Code. In this example, the address is written out like this:
United States of America, 123 Main Street, Anyton, CA 90210
Finally, for Phone Number, write your full number with the country and area code. However, note the difference from the last step in that the phone number should be written without the dashes in between.
Once you have completed all of these steps, hit the red “Next” button.
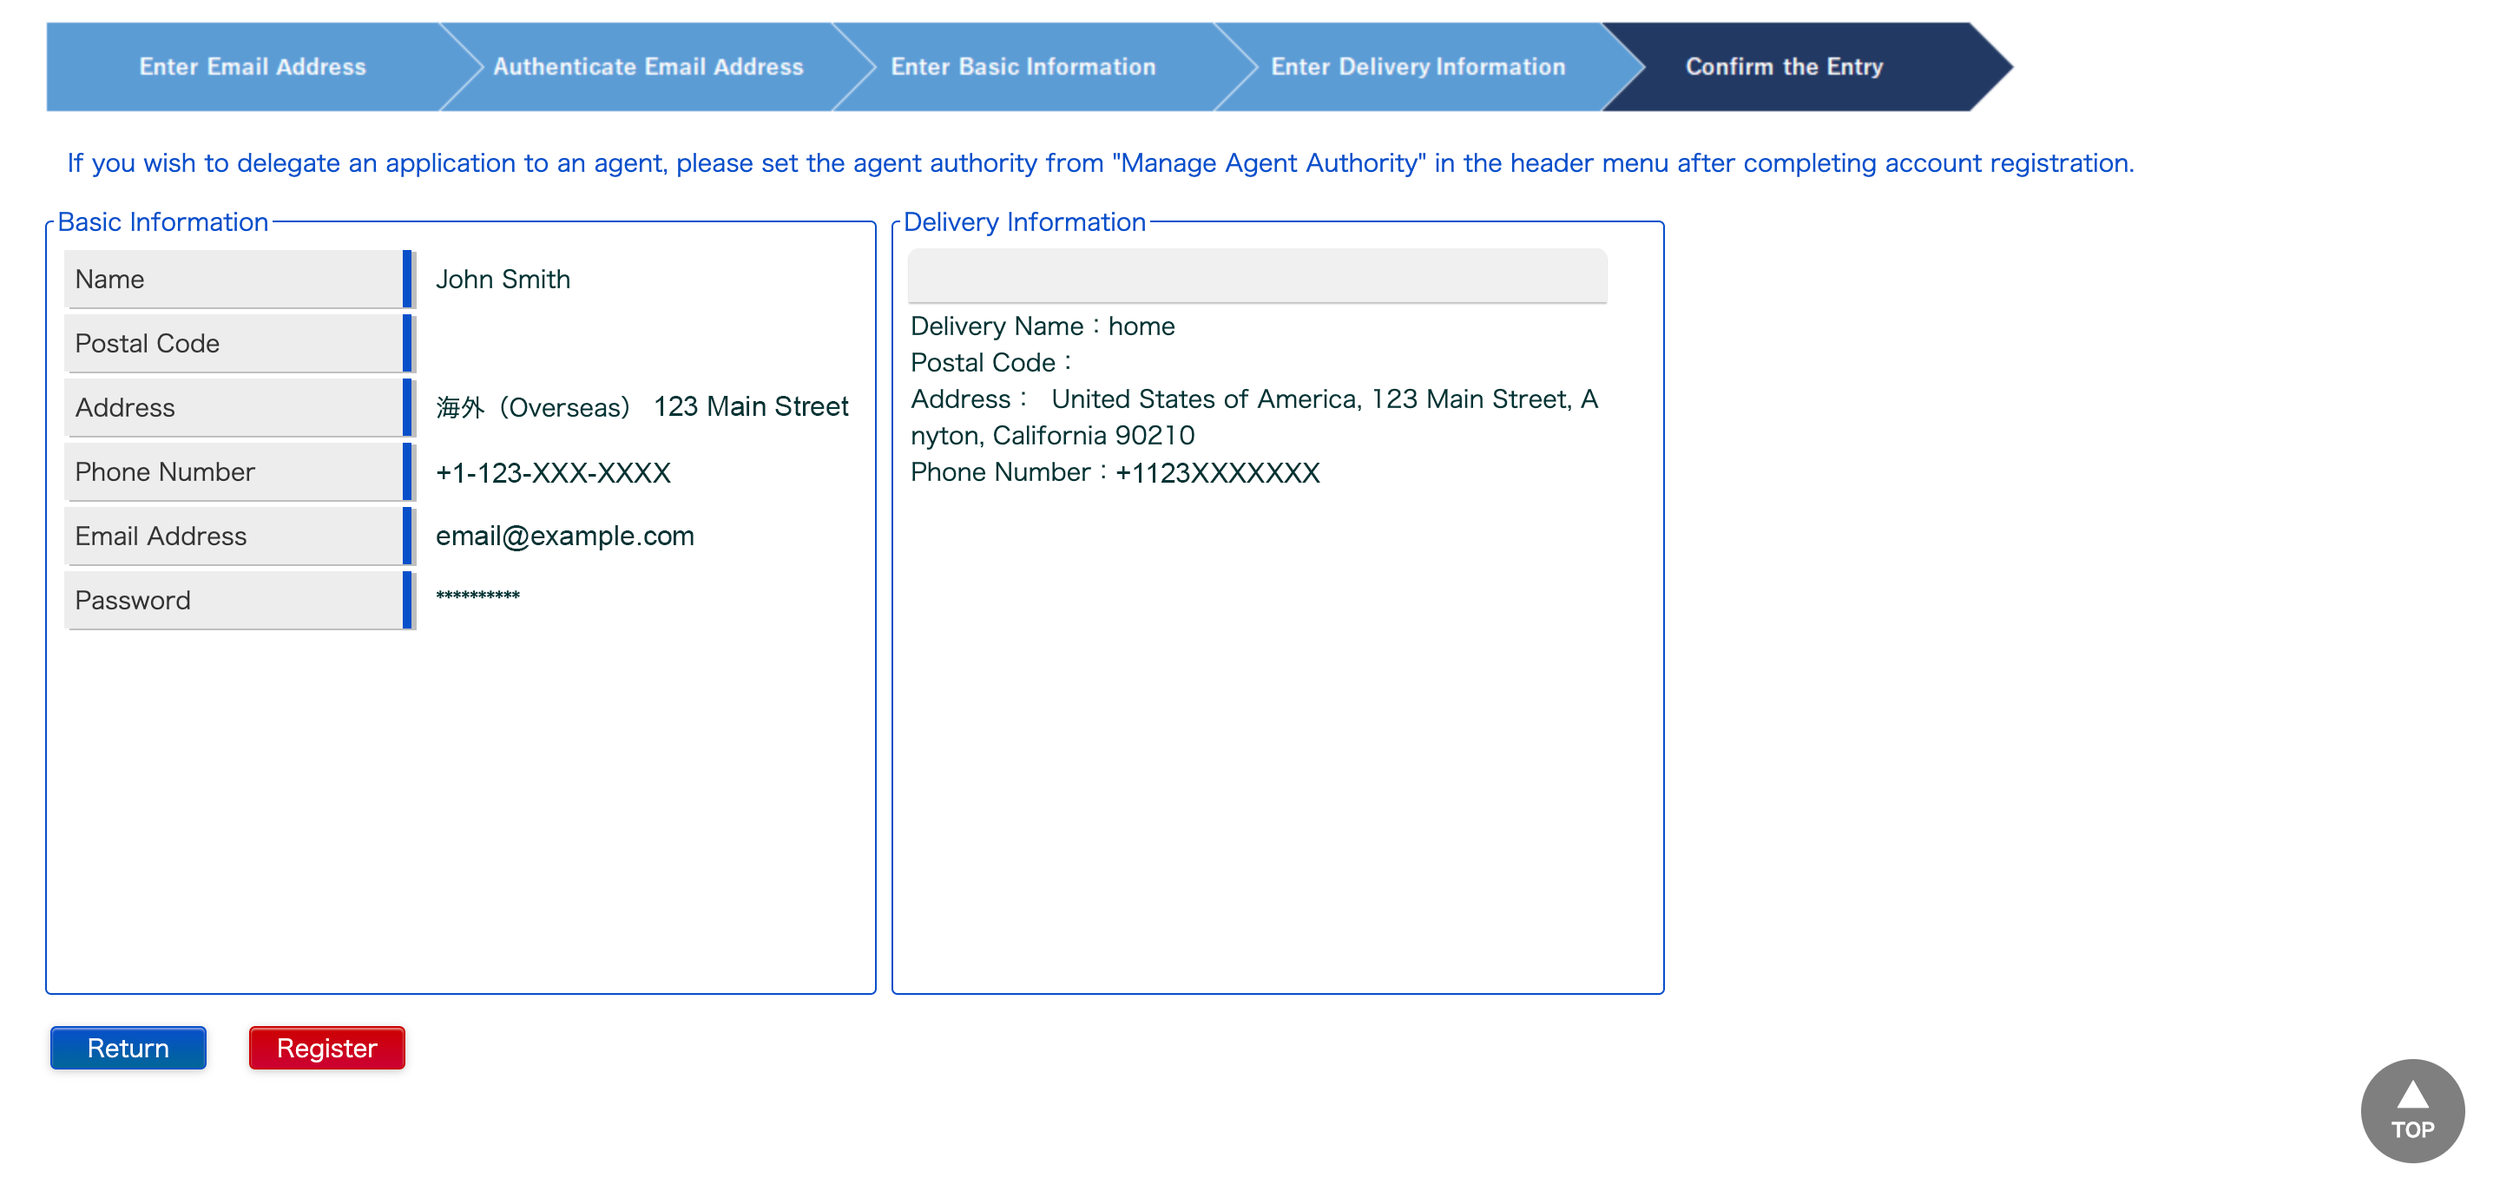
Confirm the Entry
The final step to creating your Yunyu Kakunin-Sho account is to Confirm the Entry.
Look over the Basic Information and Delivery Information sections and make sure the information is correct.
Note: If you need to adjust the information at any time, select the blue “Return” button and edit your information.
Once you have confirmed that your information is correct, select the red “Register” button.
How to Get your Japanese Import Certificate
Follow our Step-by-Step guide to obtaining your Yunyu Kakunin-sho to bring your ADHD medication to Japan
Step-by-Step Guide
Fill Out the Import Certificate Application
Once you have registered your account for the Yunyu Kakunin-Sho, the next step is to start your import application. In the Home page, there are two ways to start your application. You can either go to the section titled “Import for Personal Use” under the Application/Notification section, or select the Application dropdown in the navigation menu and select “Import for Personal Use.”

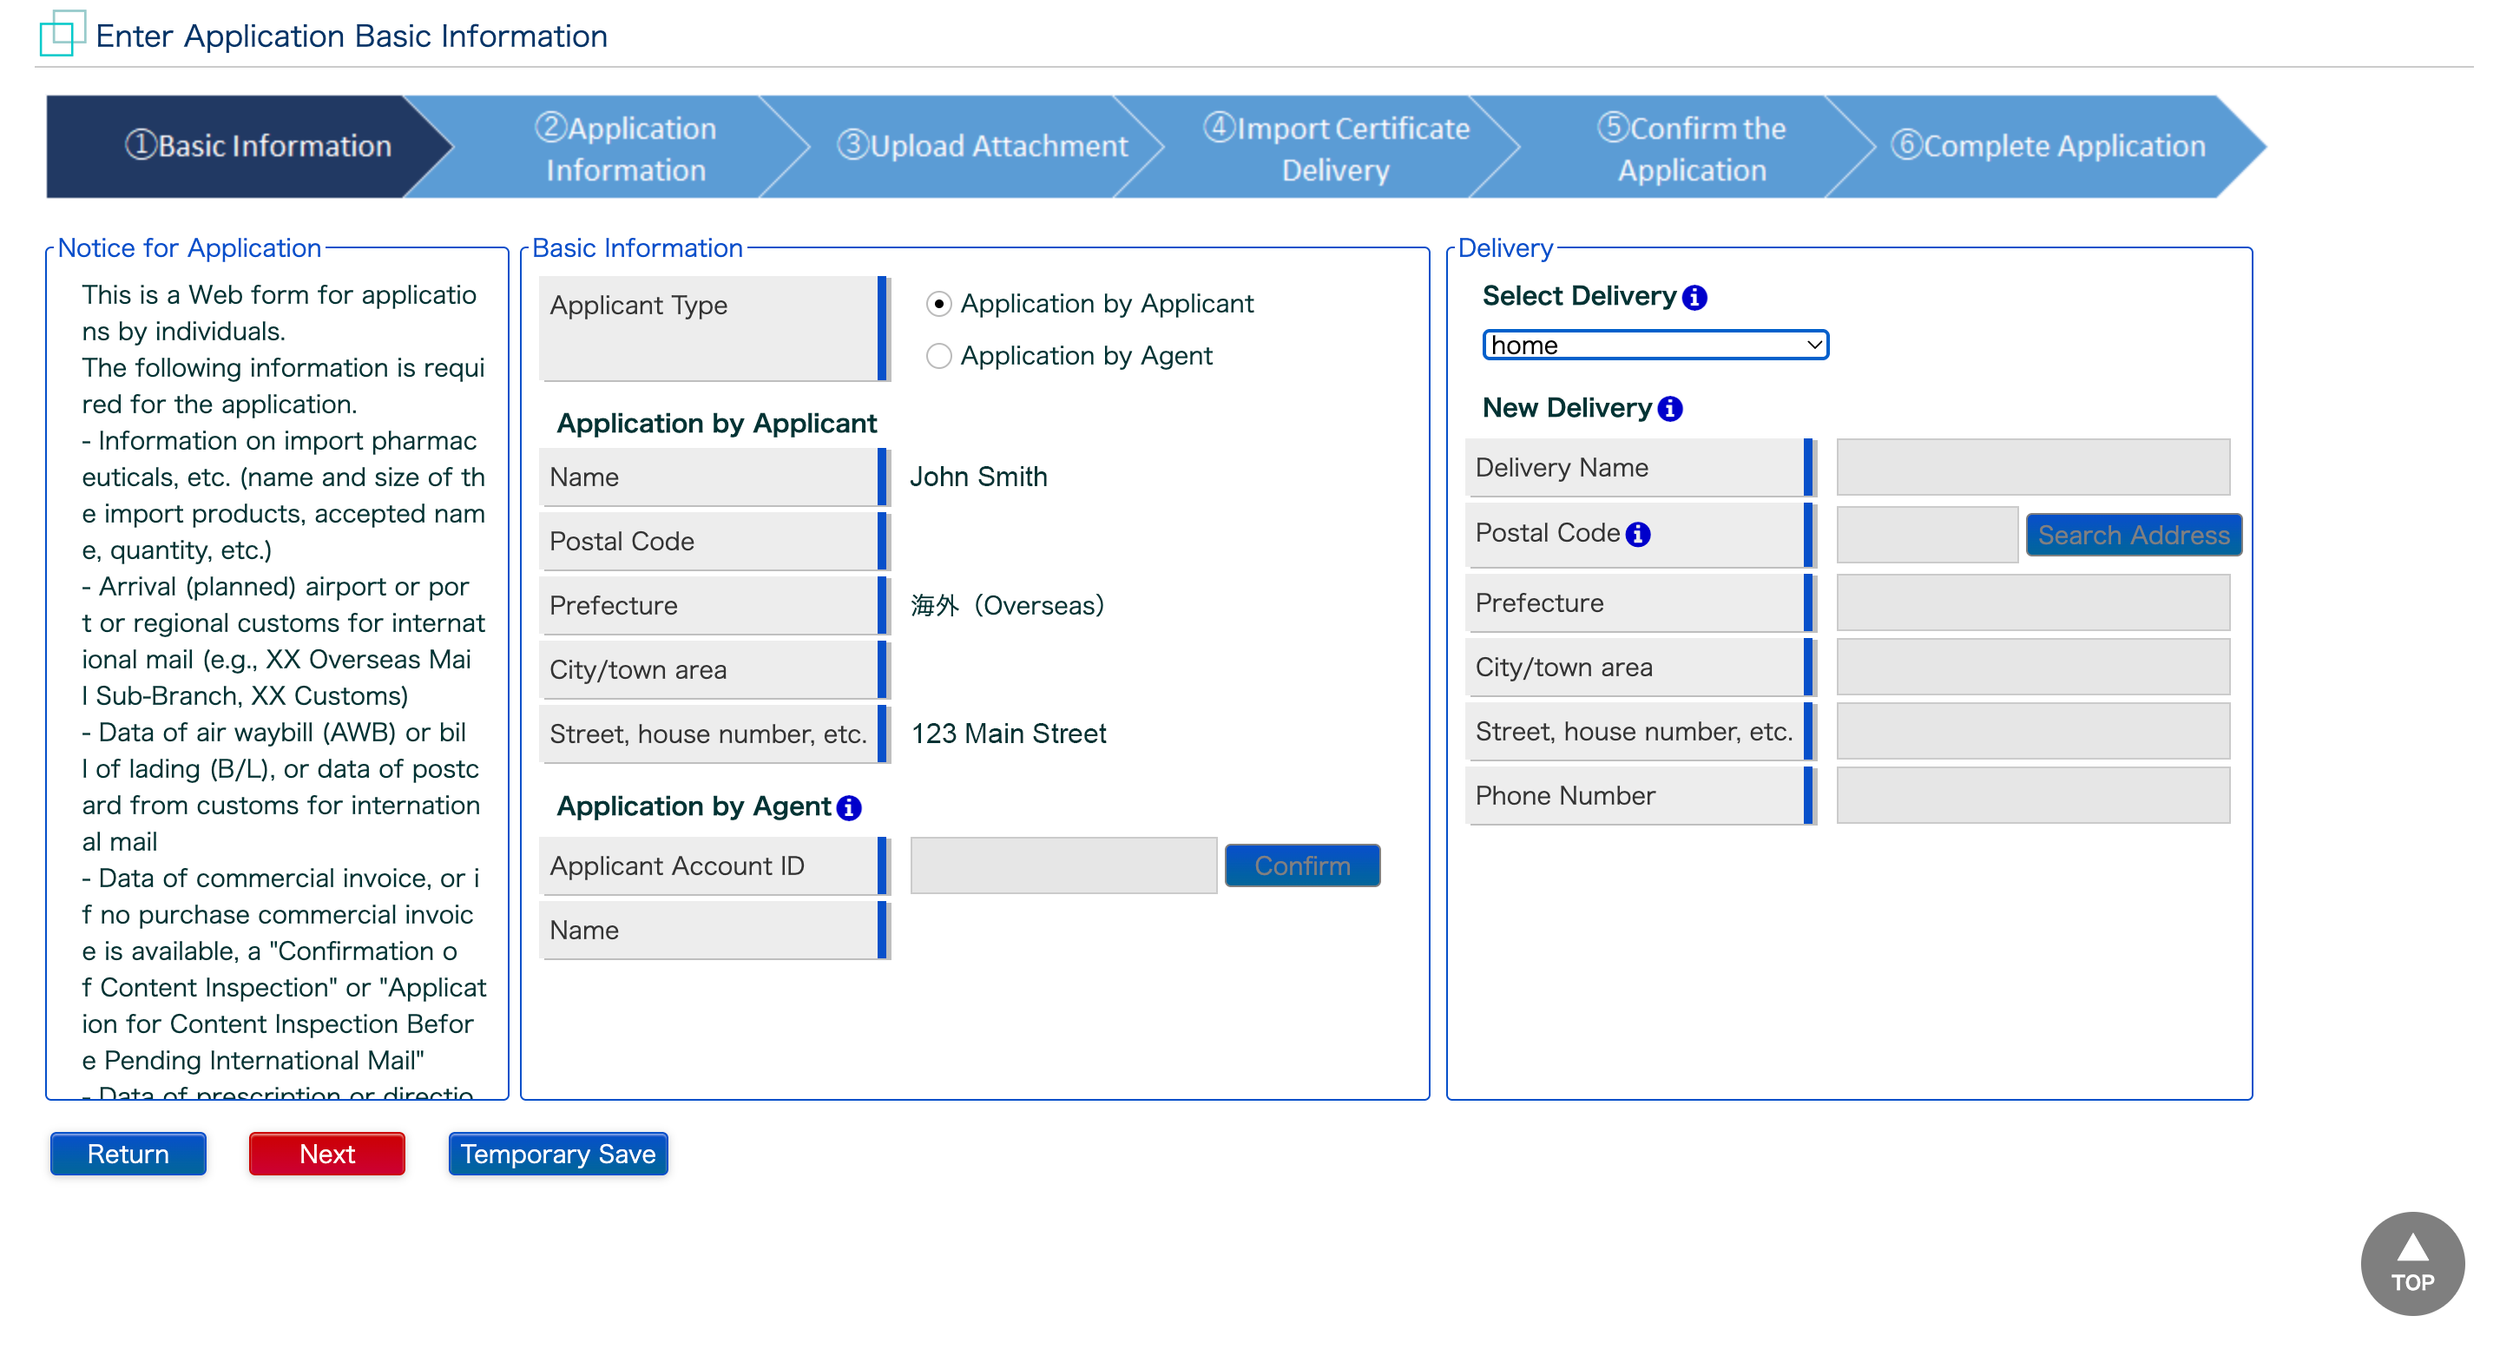
Basic Information
The first step to creating your Yunyu Kakunin-Sho application is to enter your basic information into the Basic Information page.
For the Basic Information section, on Applicant Type, select the “Application by Applicant” option because you will be filling out the form personally. The Application by Applicant information will automatically be populated based on your previous answers from when you registered for an account.
In Delivery, under Select Delivery, click on the dropdown and select the address titled “home.” If you recall, we already entered the delivery address information for “home” during registration.
If you have a new delivery address, select the “Not Selected” option and fill out the relevant sections under New Delivery.
Once you have completed these steps, you can move on to the next section by clicking the red “Next” button at the bottom.
Note: If you need to save and come back at any time, you can select the “Temporary Save” button at the bottom to return to the application at a later date.
Application Information - Import Products Information
The next step is to enter the information in the Import Products Information section.
For import date, click on the calendar icon and select the date you will be entering Japan.
In B/L No., AWB No., etc, you will be asked to enter your flight number. You should be able to find your flight number in your itinerary from the airline you booked your tickets with. In this example, we chose United Airlines.
For Arrival Place (Airport, Port, or Storage Place) click the dropdown and select the airport you will be flying into. For this example, we have chosen the Haneda Airport (HND) in Tokyo. Once you have selected the airport, the Reception of Application field should be filled automatically based on the airport you selected.
Finally, scroll down to the Oath and Confirmation Matter. Read the information carefully because selecting the checkbox for “I have confirmed all the above oath nd confirmation matters.”

Application Information - Item Information
Once you have finished the Import Products Information section on the Application Information page, scroll down to the Item Information section.
For Item Type, click the dropdown menu and select which category your medication goes into. Most prescription medication falls under the “Pharmaceuticals” category.
Under the Name and Size of the Import Products, enter the medication name as shown on your prescription and the dosage. For this example, we have chosen 3 medications and written them out in the proper formatting: “Ritalin LA 40mg, Methylphenidate 10mg, and Escitalopram 10mg.”
In the Quantity section, write the amount of medication units you will be bringing. In this example, we will be bringing 30 units.
Finally, under Unit, indicate the form of medication you will be bringing- This could include capsules, tablets, liquid, etc.
To add another medication to the list, select the + button in the top left corner of the table.
Once you have filled out the Item Information table, click the blue “Update Item Details” button in the upper left corner.

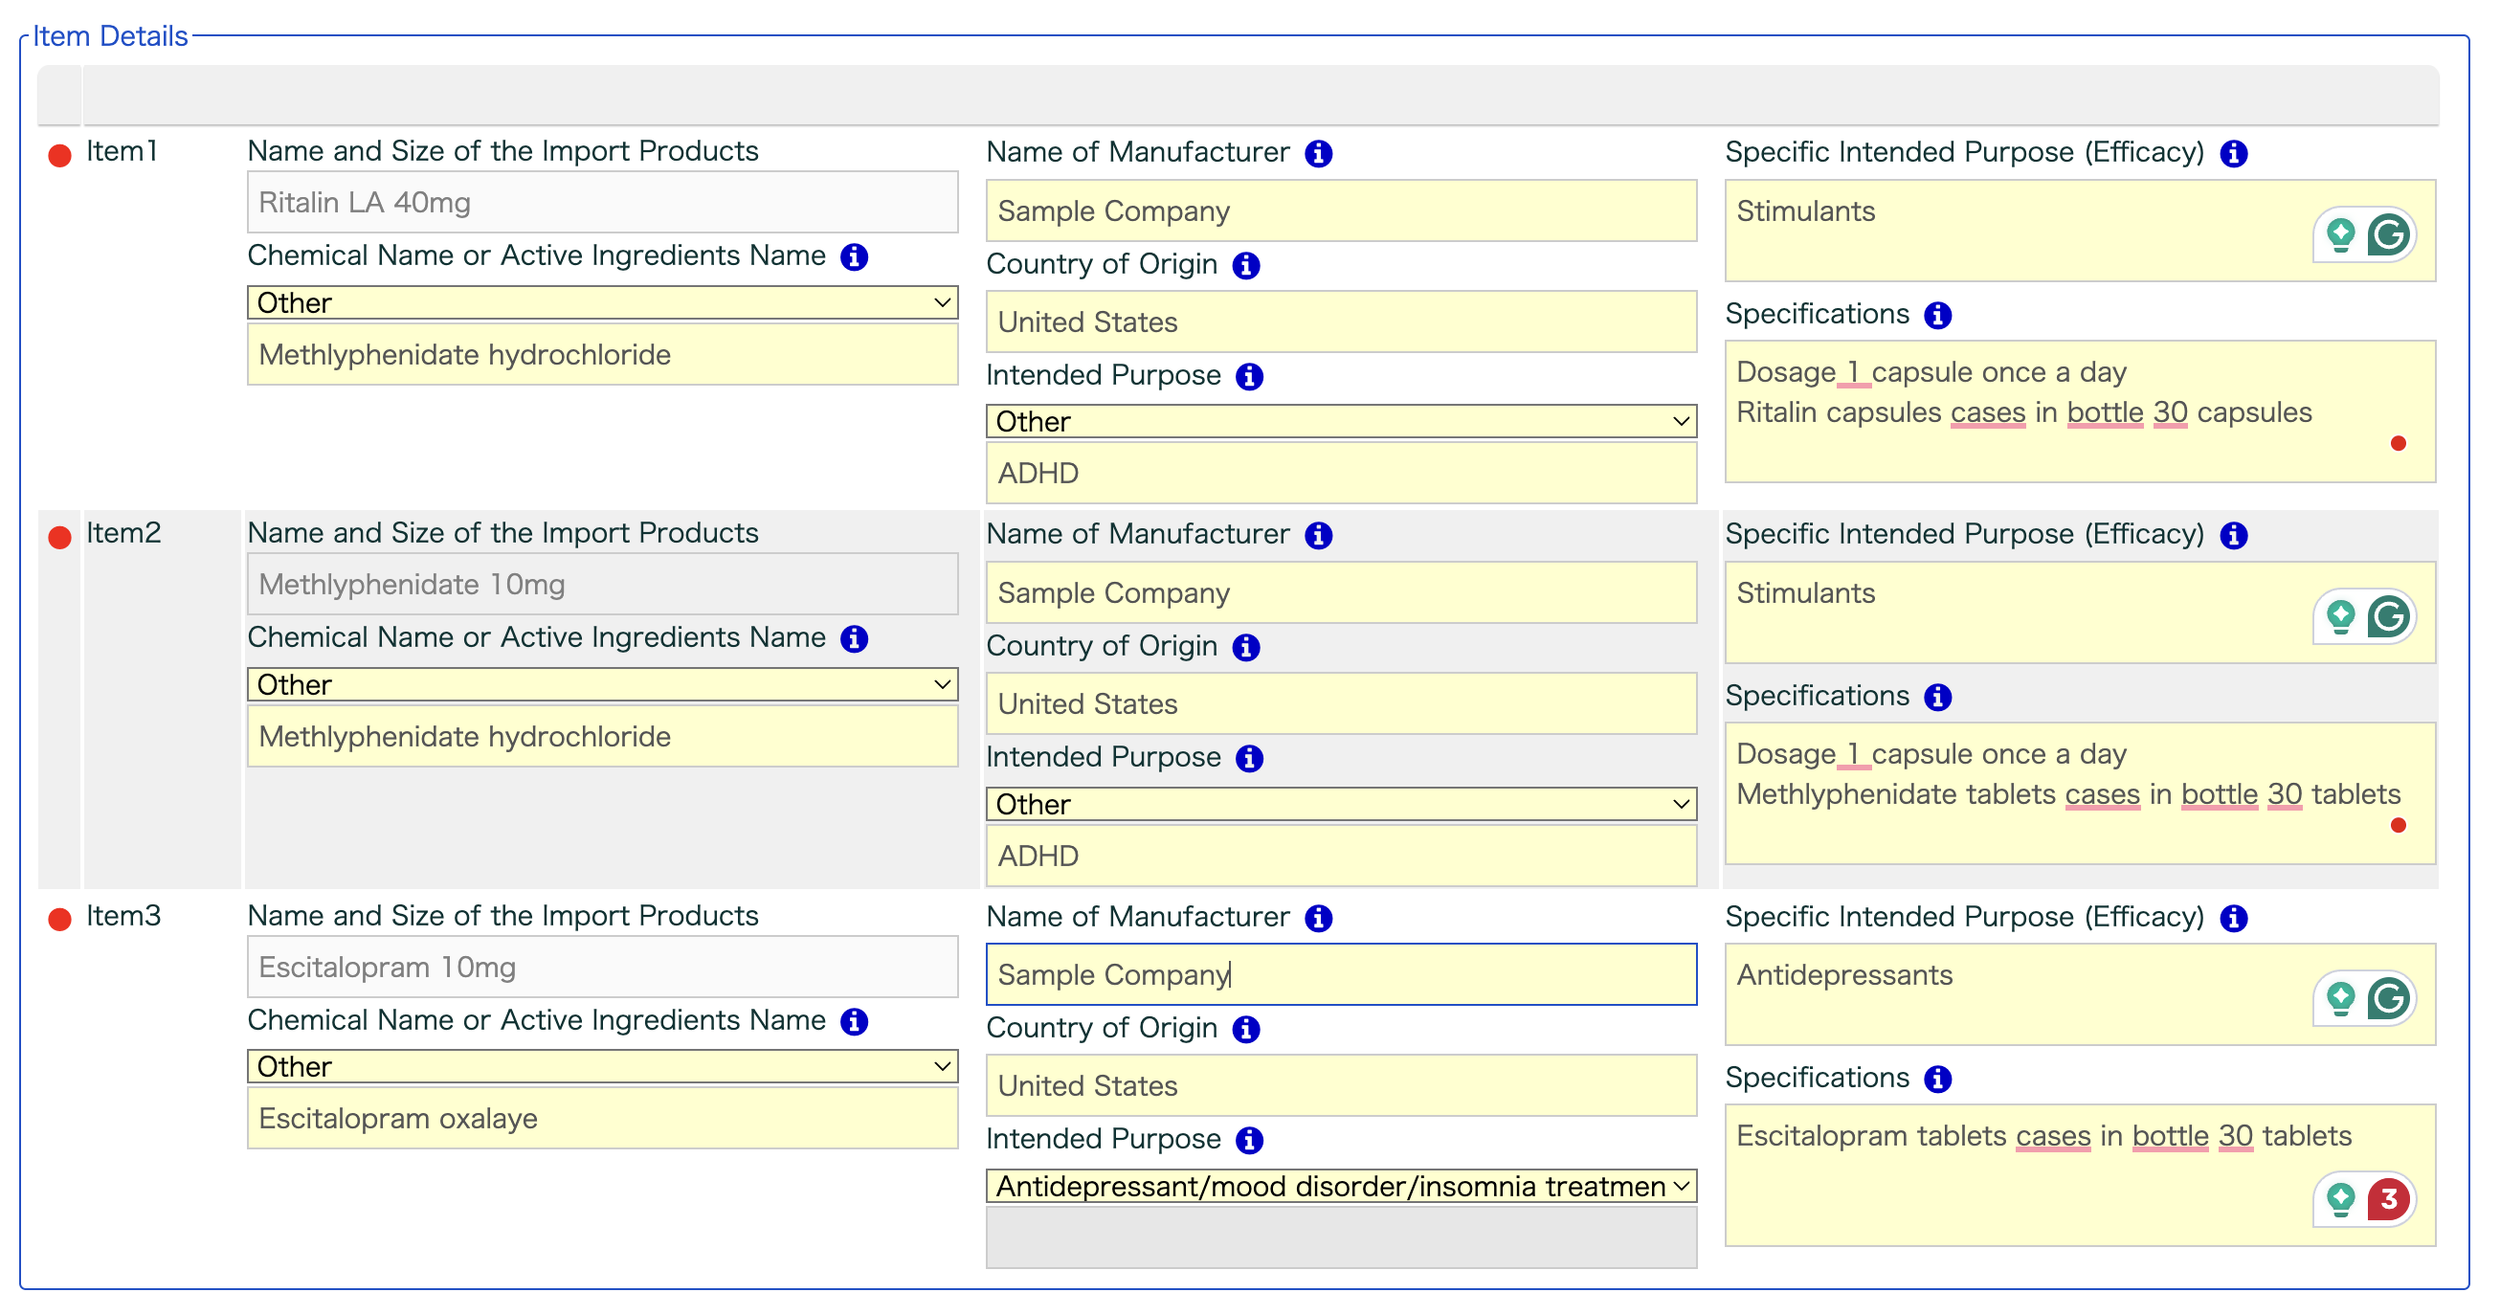
Application Information - Item Details
Once you have finished the Item Information section, the Item Details table should appear below it for you to fill out.
The Name and Size of the Import Products field will be automatically filled with the information from the previous table.
Under Chemical Name or Active Ingredients Name, click the dropdown and select the active ingredients.
If the active ingredients of your medication are not listed in the options, select “Other” and write the chemical name of the medication in the field directly below it.
For this example, Ritalin LA 40mg falls under the “Other” option, and we have written its chemical name (also known as its generic name), “Methlyphenidate hydrochloride” underneath.
For Name of Manufacturer, oftentimes the manufacturer's name is found on the medication bottle.
If you do not have the bottle on hand or cannot find the manufacturer's name, you can simply look up your medication manufacturer online. For this example, we have simply written “sample company” as a placeholder.
Under Country of Origin, simply write the country in which you filled your medications. In this case, it is the United States.
Next, select the Intended Purpose from the dropdown menu.
For ADHD medications and stimulants, select the “Other” option and write in the intended purpose in the field directly below. For Ritalin LA 40mg, you can simply write “ADHD” in the blank field. For Escitalopram, which is a medication use to treat anxiety and depression, the purpose you would choose is “Antidepressant/mood disorder/insomnia treatment.”
Moving on to Specific Intended Purpose (Efficacy), the form is asking about which category or class of medication the prescription falls under.
For ADHD stimulants, you can simply write “Stimulants.”
For our example, Escitalopram 10mg falls under “Antidepressants.”
For Specifications, you will be asked to write the specifics of your medication, including:
Dosage and dosage frequency in line 1
Medication name, unit type, storage type and quantity in line 2.
We have written out the exact wording in our example below. For Ritalin 40 mg, the correct format for Specifications is as follows:
“Dosage 1 capsule once a day
Ritalin capsules cases in bottle 30 capsules.”
Once you have filled out the table for all of your medications, select the red “Next” button to continue to the next step.
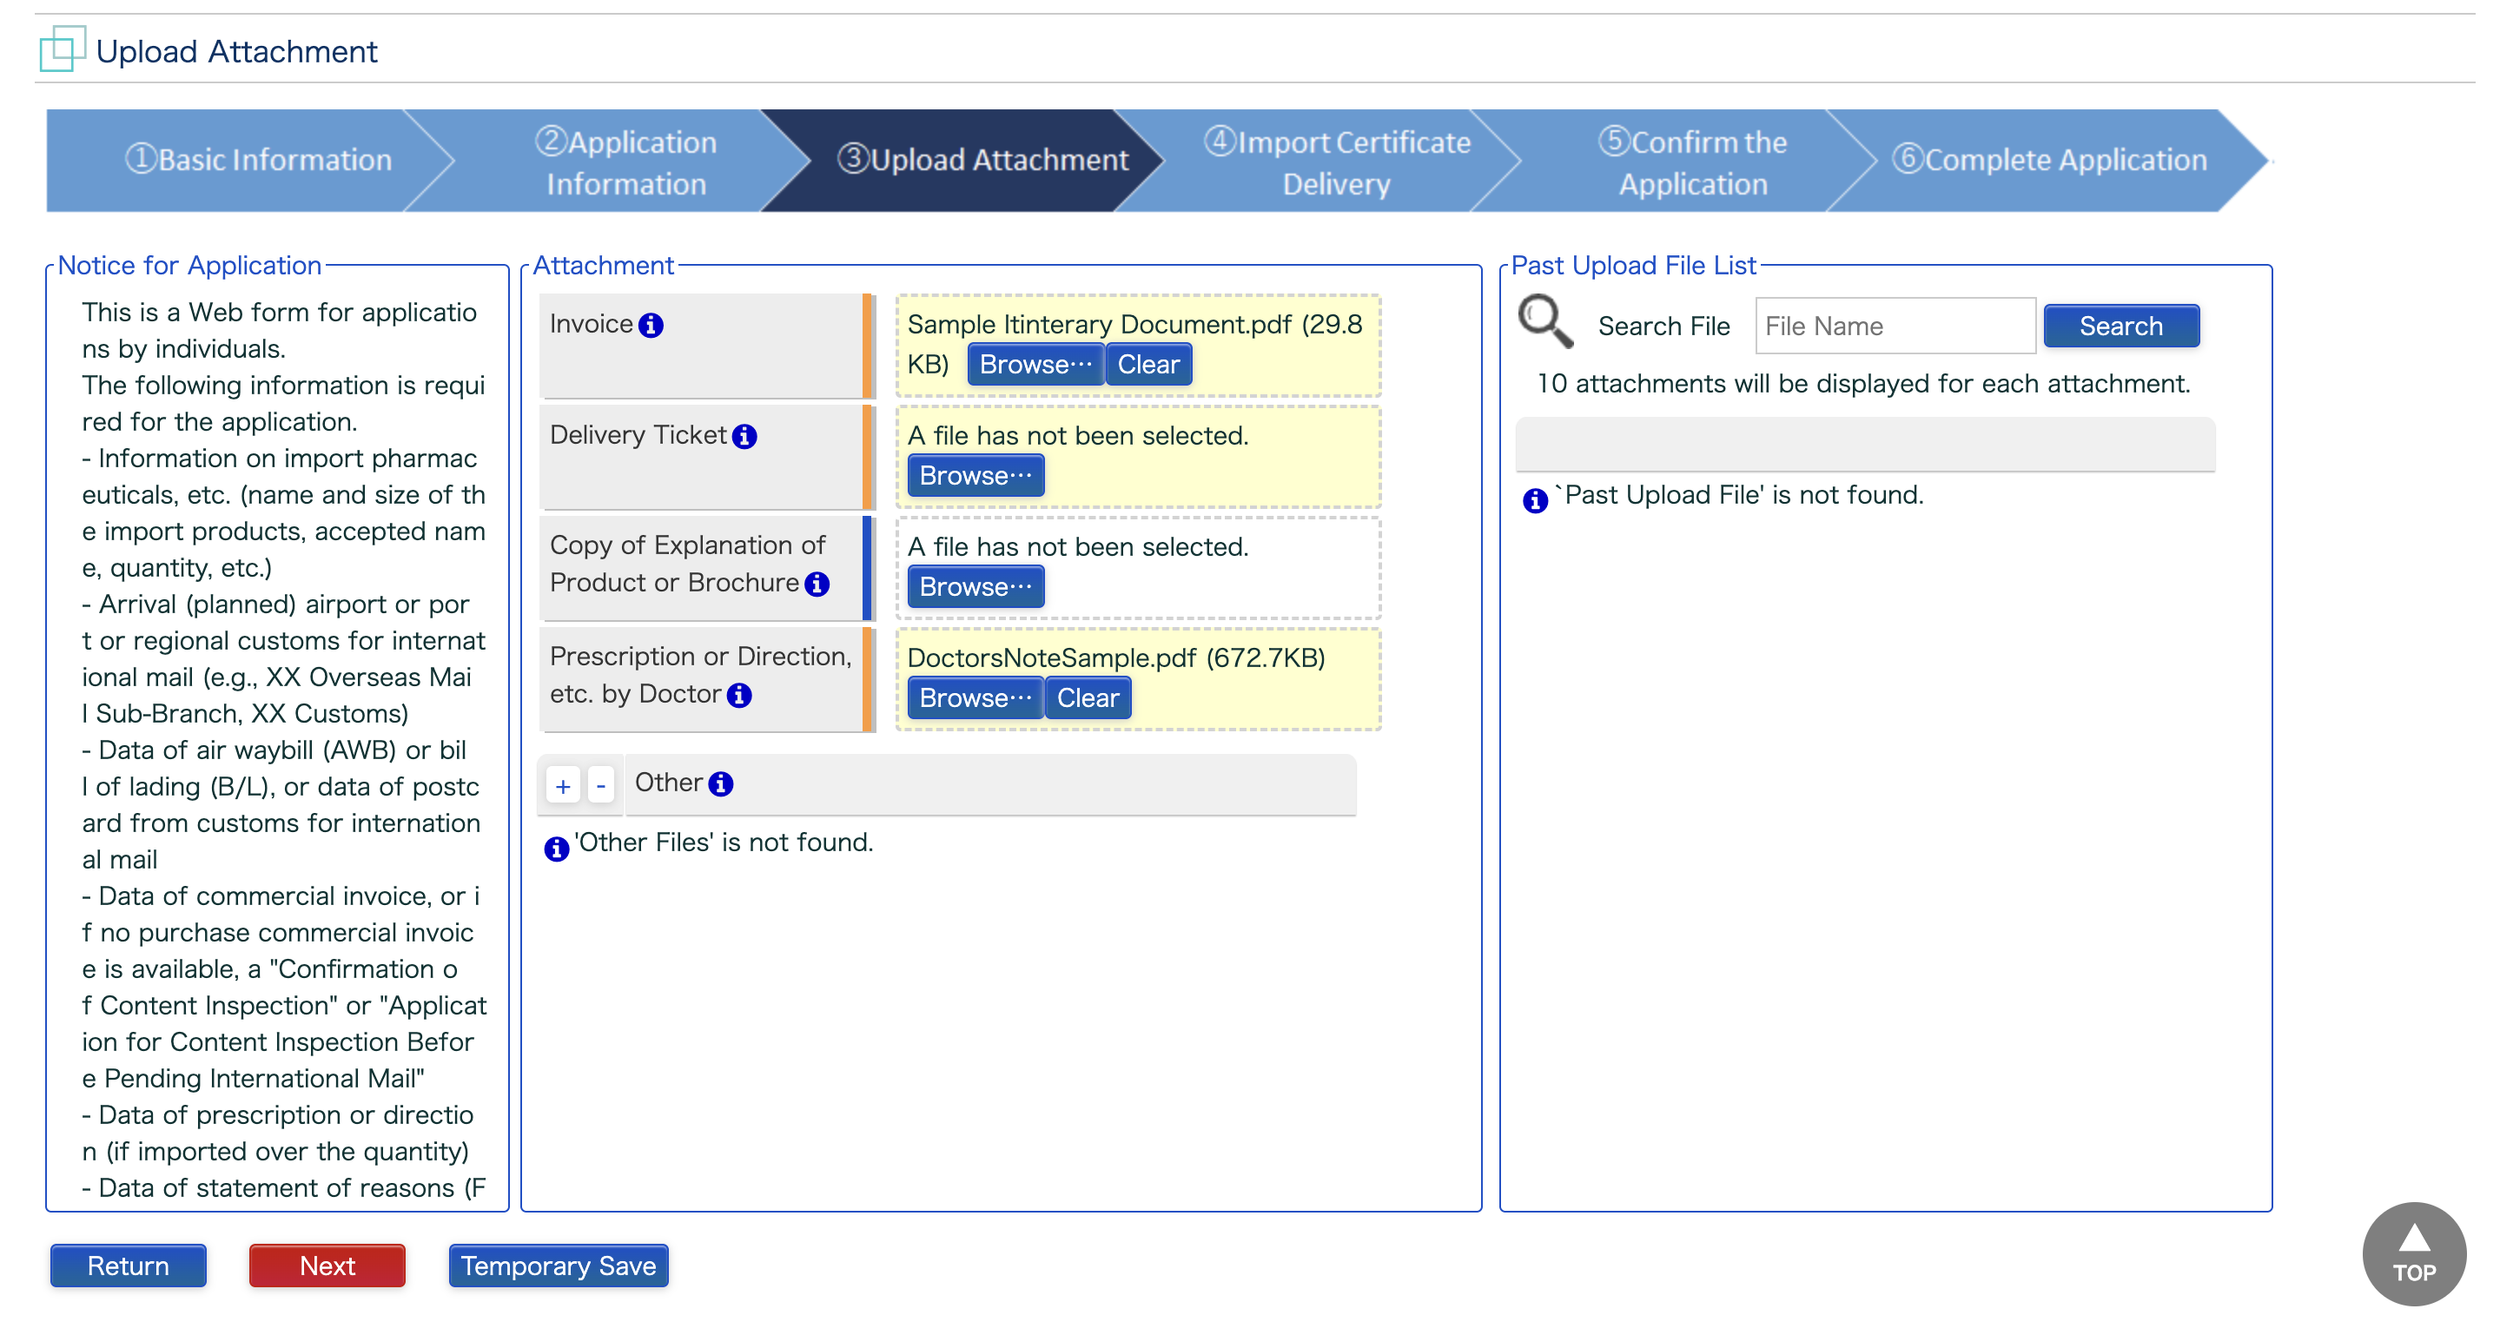
Upload Attachment
The next step to completing your Yunyu Kakunin-Sho application is to upload the proper documentation. See our article Documentation and More to learn about obtaining the required documents from your doctor.
Firstly, for Invoice, since you are bringing your medications into Japan personally, you will simply need to upload a copy of your flight e-ticket or itinerary. Make sure the itinerary includes your name, flight number, and airport of arrival. If at any point you are confused about the requirements for your uploaded documentation, you can reference the blue information icons next to the field for more information.
Secondly, for Delivery Ticket, you can leave it blank. This is because you will be bringing your medication into Japan personally, and therefore are not required to attach anything for this section.
Thirdly, Copy of Explanation of Product or Brochure is optional. This section is for you to attach any product explanations or distributor brochures as additional material. This section is completely optional and not required, but some people choose to attach brochures for extra peace of mind.
Finally, the Prescription or Direction, etc. by Doctor section is very important. Here, you will be asked to upload your doctor’s note and list of prescriptions. If you have multiple documents, you can use file management programs like Adobe Acrobat to quickly combine these files into a single document.
Additionally, you can upload even more supplementary materials in the Other section by clicking the + icon.
Once you have successfully uploaded all of your required documentation, you can select the red “Next” button to move on to the next step.
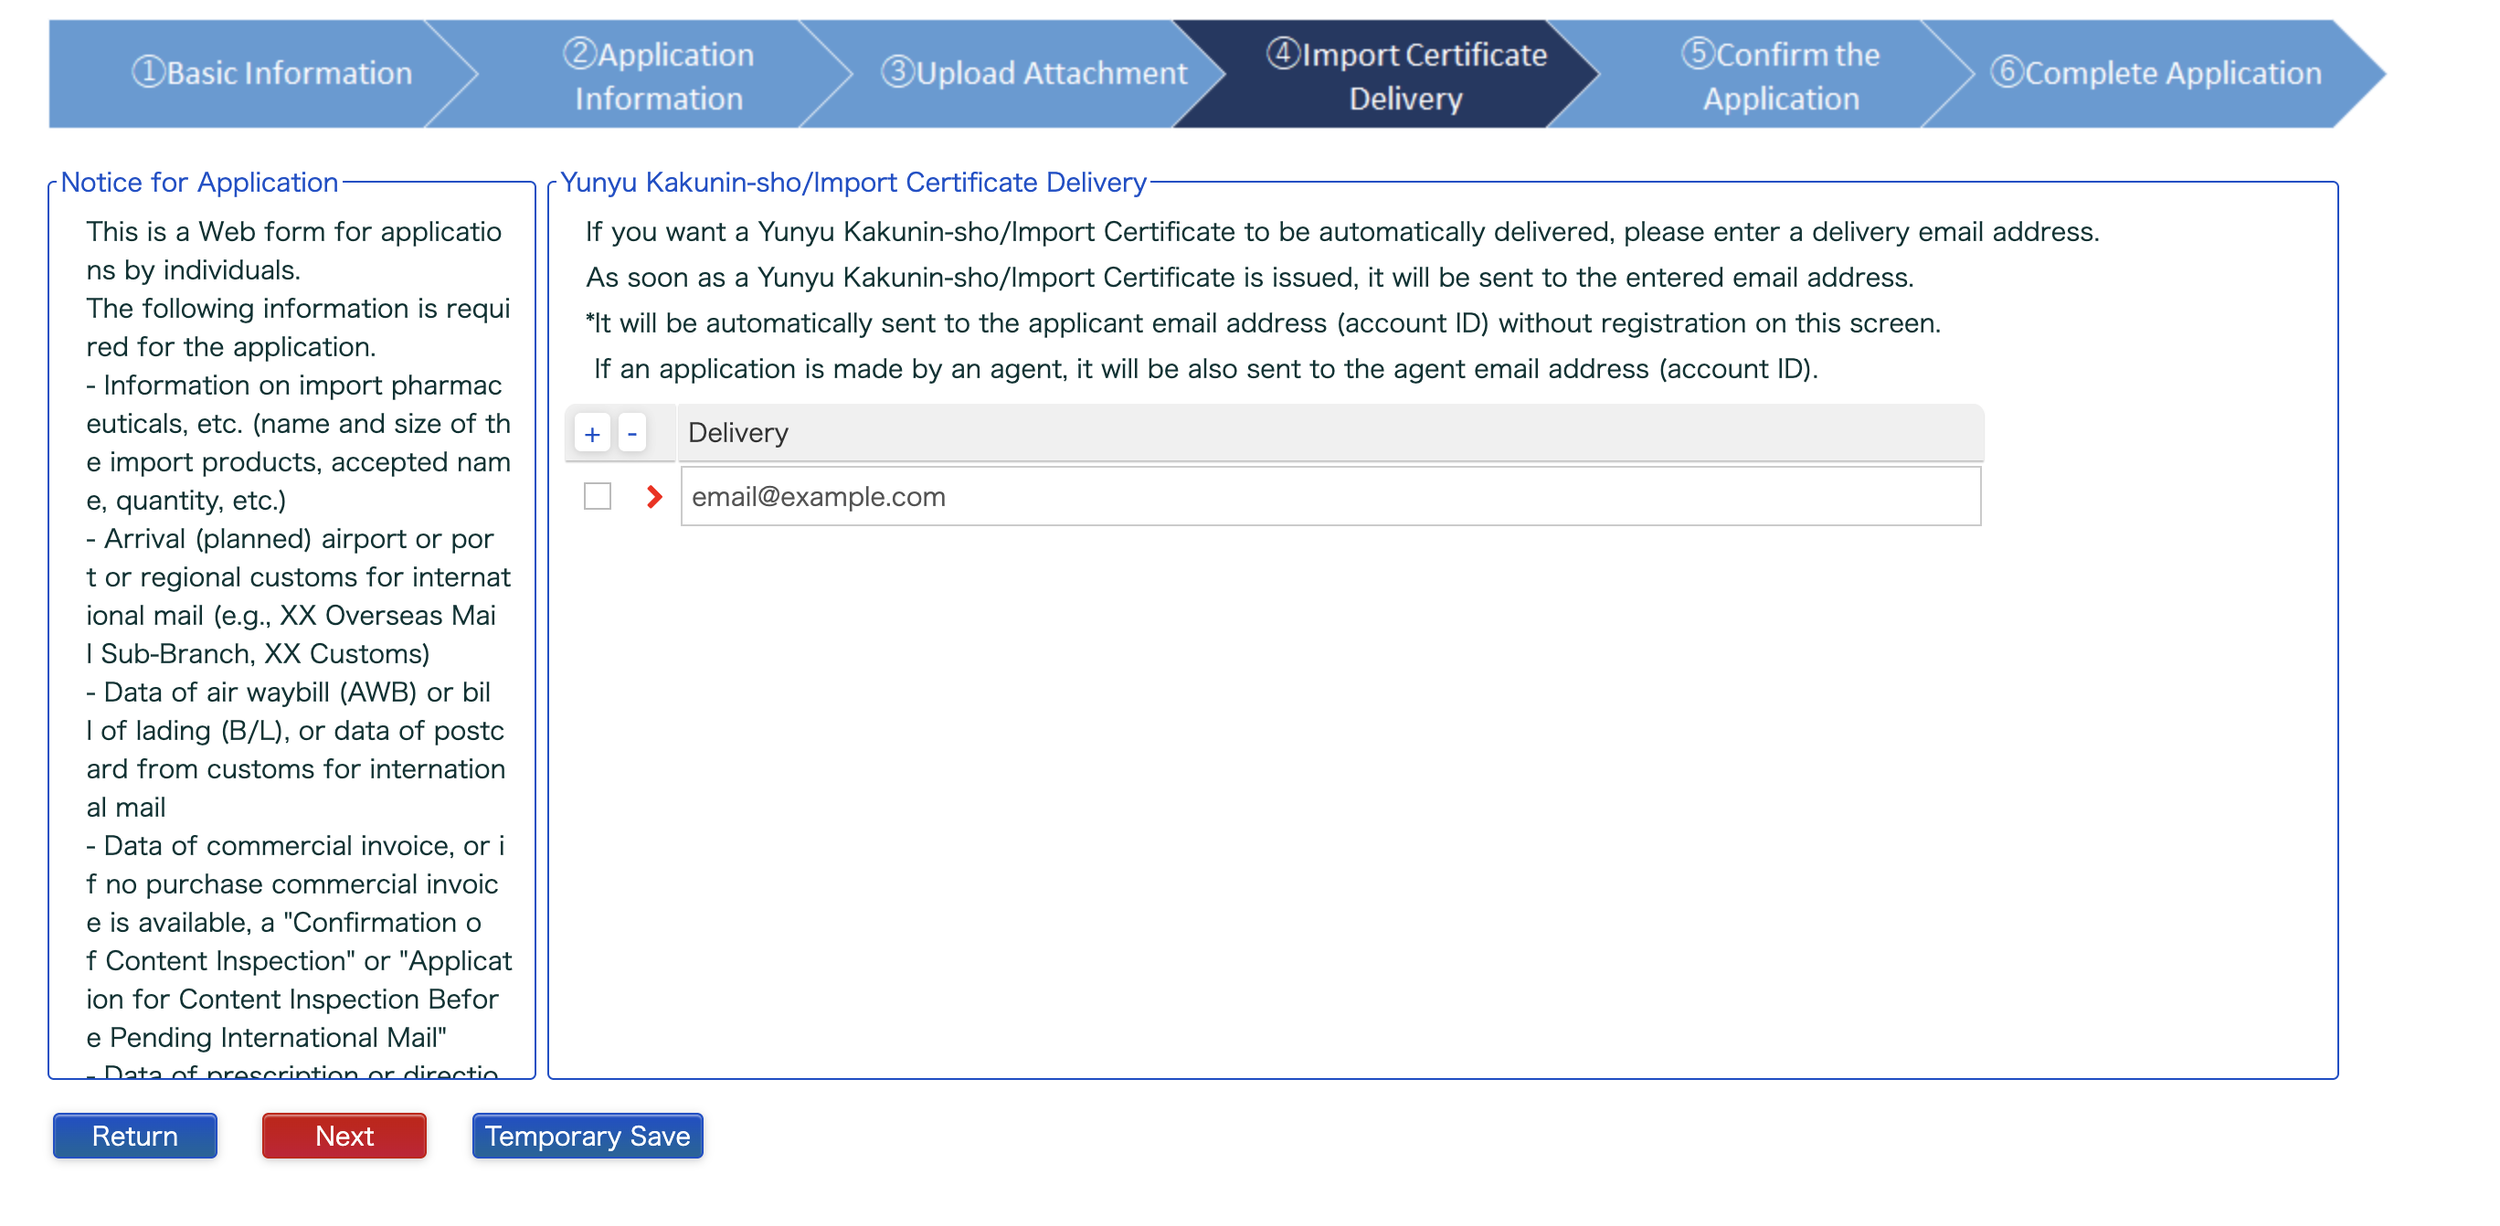
Import Certificate Delivery
This step is fairly simple. In the text field under Delivery, you will be asked to enter the email address that you would like for your import certificate to be delivered to. This will ensure that you will receive your Yunyu Kakunin-Sho certificate as soon as possible. If the email you used to register your account is the same as the email you would like the import certificate to be delivered to, you can leave this part blank. Once you have finished this step, select the red “Next” button to continue.
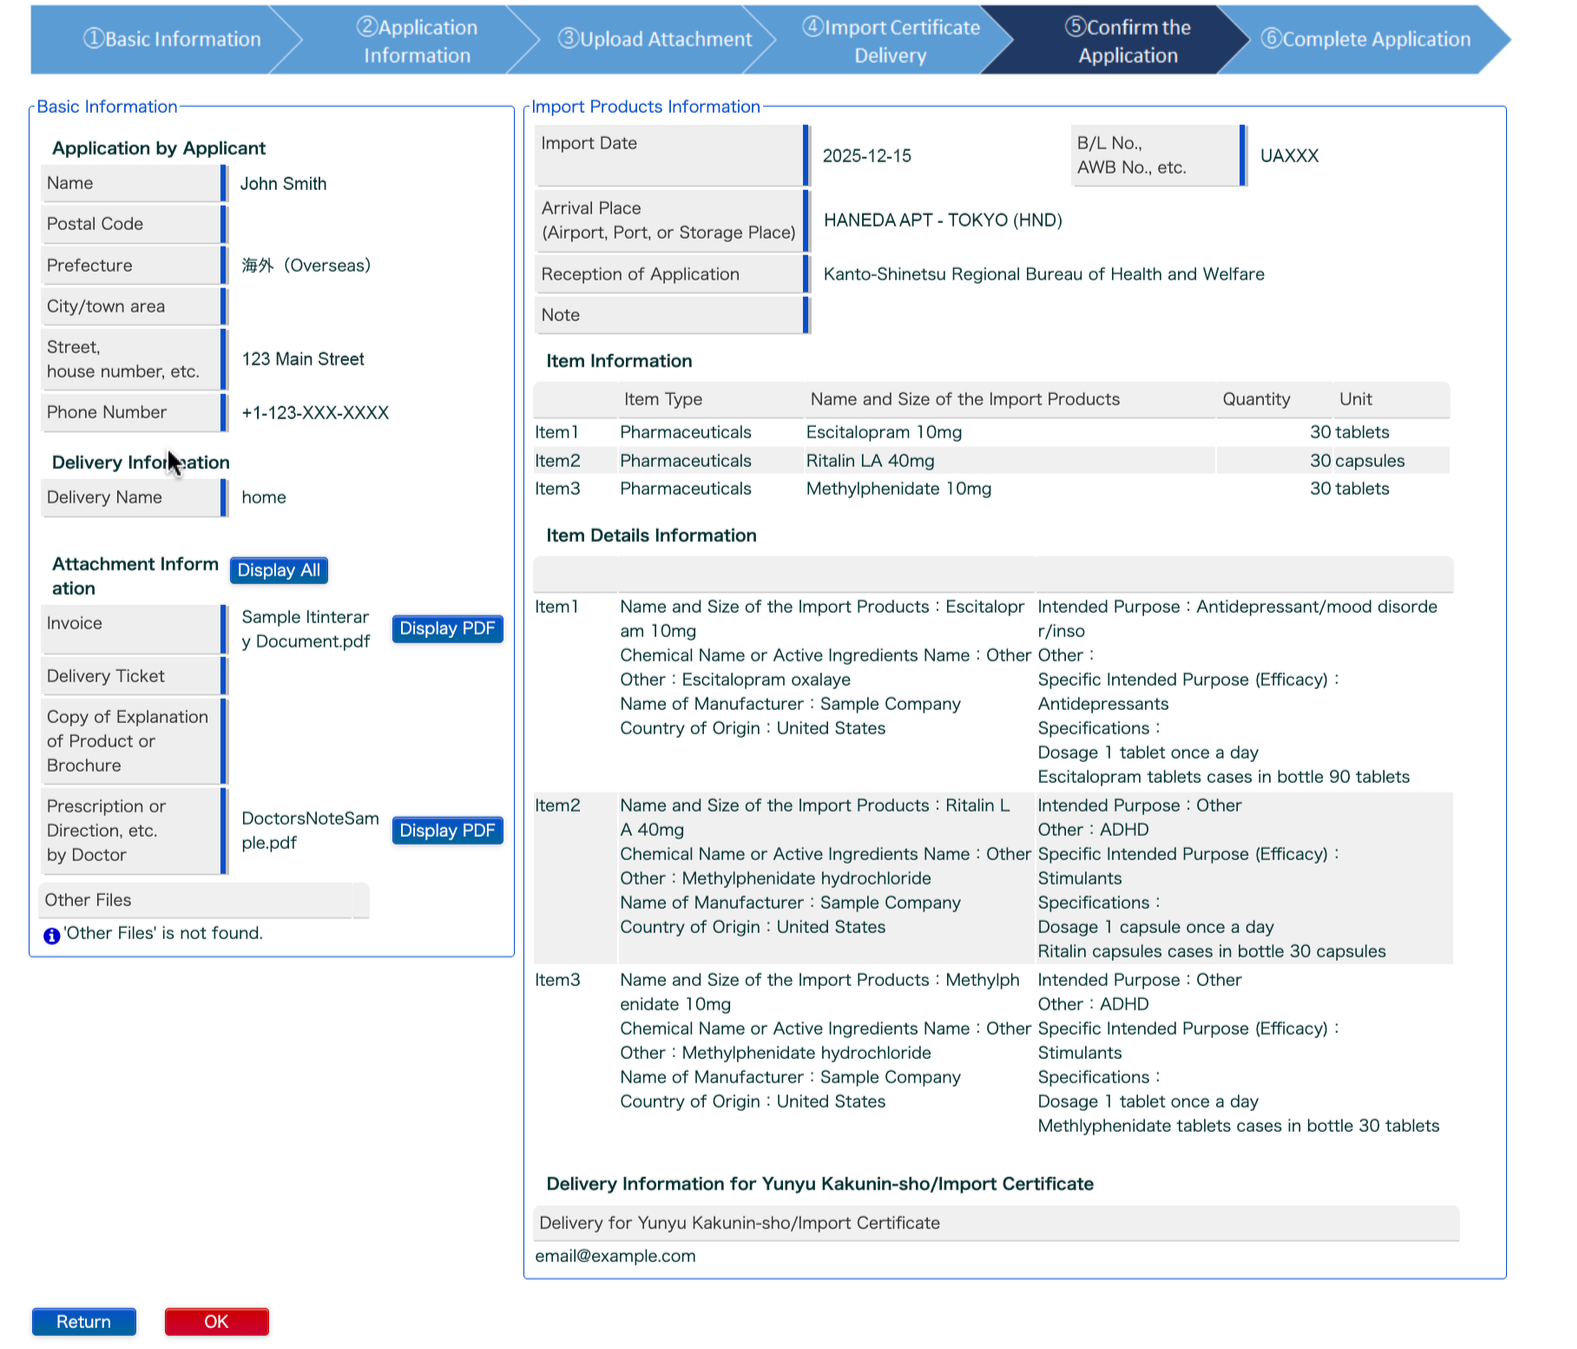
Confirm the Application
The next step is to confirm the application. Look over your information and make sure it is correct before you click “OK.” Then move on to the complete application section.
Next Steps
Congratulations! You have successfully completed your Japanese Yunyu Kakunin-Sho application! Here are some next steps for preparing for your trip to Japan:
Receiving your Import Certificate: Within the next few days after submitting your application, you should receive a digital copy in your email of your official Yunyu Kakunin-sho Japanese Medication Import Certificate from the Bureau of Health and Welfare within the next few days. Keep an eye on your inbox for an email from system@impconf.mhlw.go.jp with the subject line: 【AIC】輸入確認発給通知 ( Issuance Notice ).
Printing your Import Certificate: Once you have received your Issuance Notice, you should immediately download your import certificate to your device and print a physical copy of the entire document to bring with you on your trip to Japan. It is suggested that you keep both a digital and a printed copy of the import certificate on hand in your carry-on so that you have it ready for customs.
Declaring Medications at Customs: When you land in Japan and go through customs, you will be asked to declare your prescription medications. During this time, you will be able to take out your import certificate and show it to the Japanese customs officer. The officer will go down the list of medications and may ask you to take out the specific prescriptions mentioned in the list. Once the customs officer has confirmed that everything is listed, you will be free to go on your way.